> ## Documentation Index
> Fetch the complete documentation index at: https://docs.textyess.com/llms.txt
> Use this file to discover all available pages before exploring further.
# Back-in-stock button installation
> Let shoppers ask for a WhatsApp message when a sold-out product is back. Add the button from the Shopify theme editor, or with a code snippet.
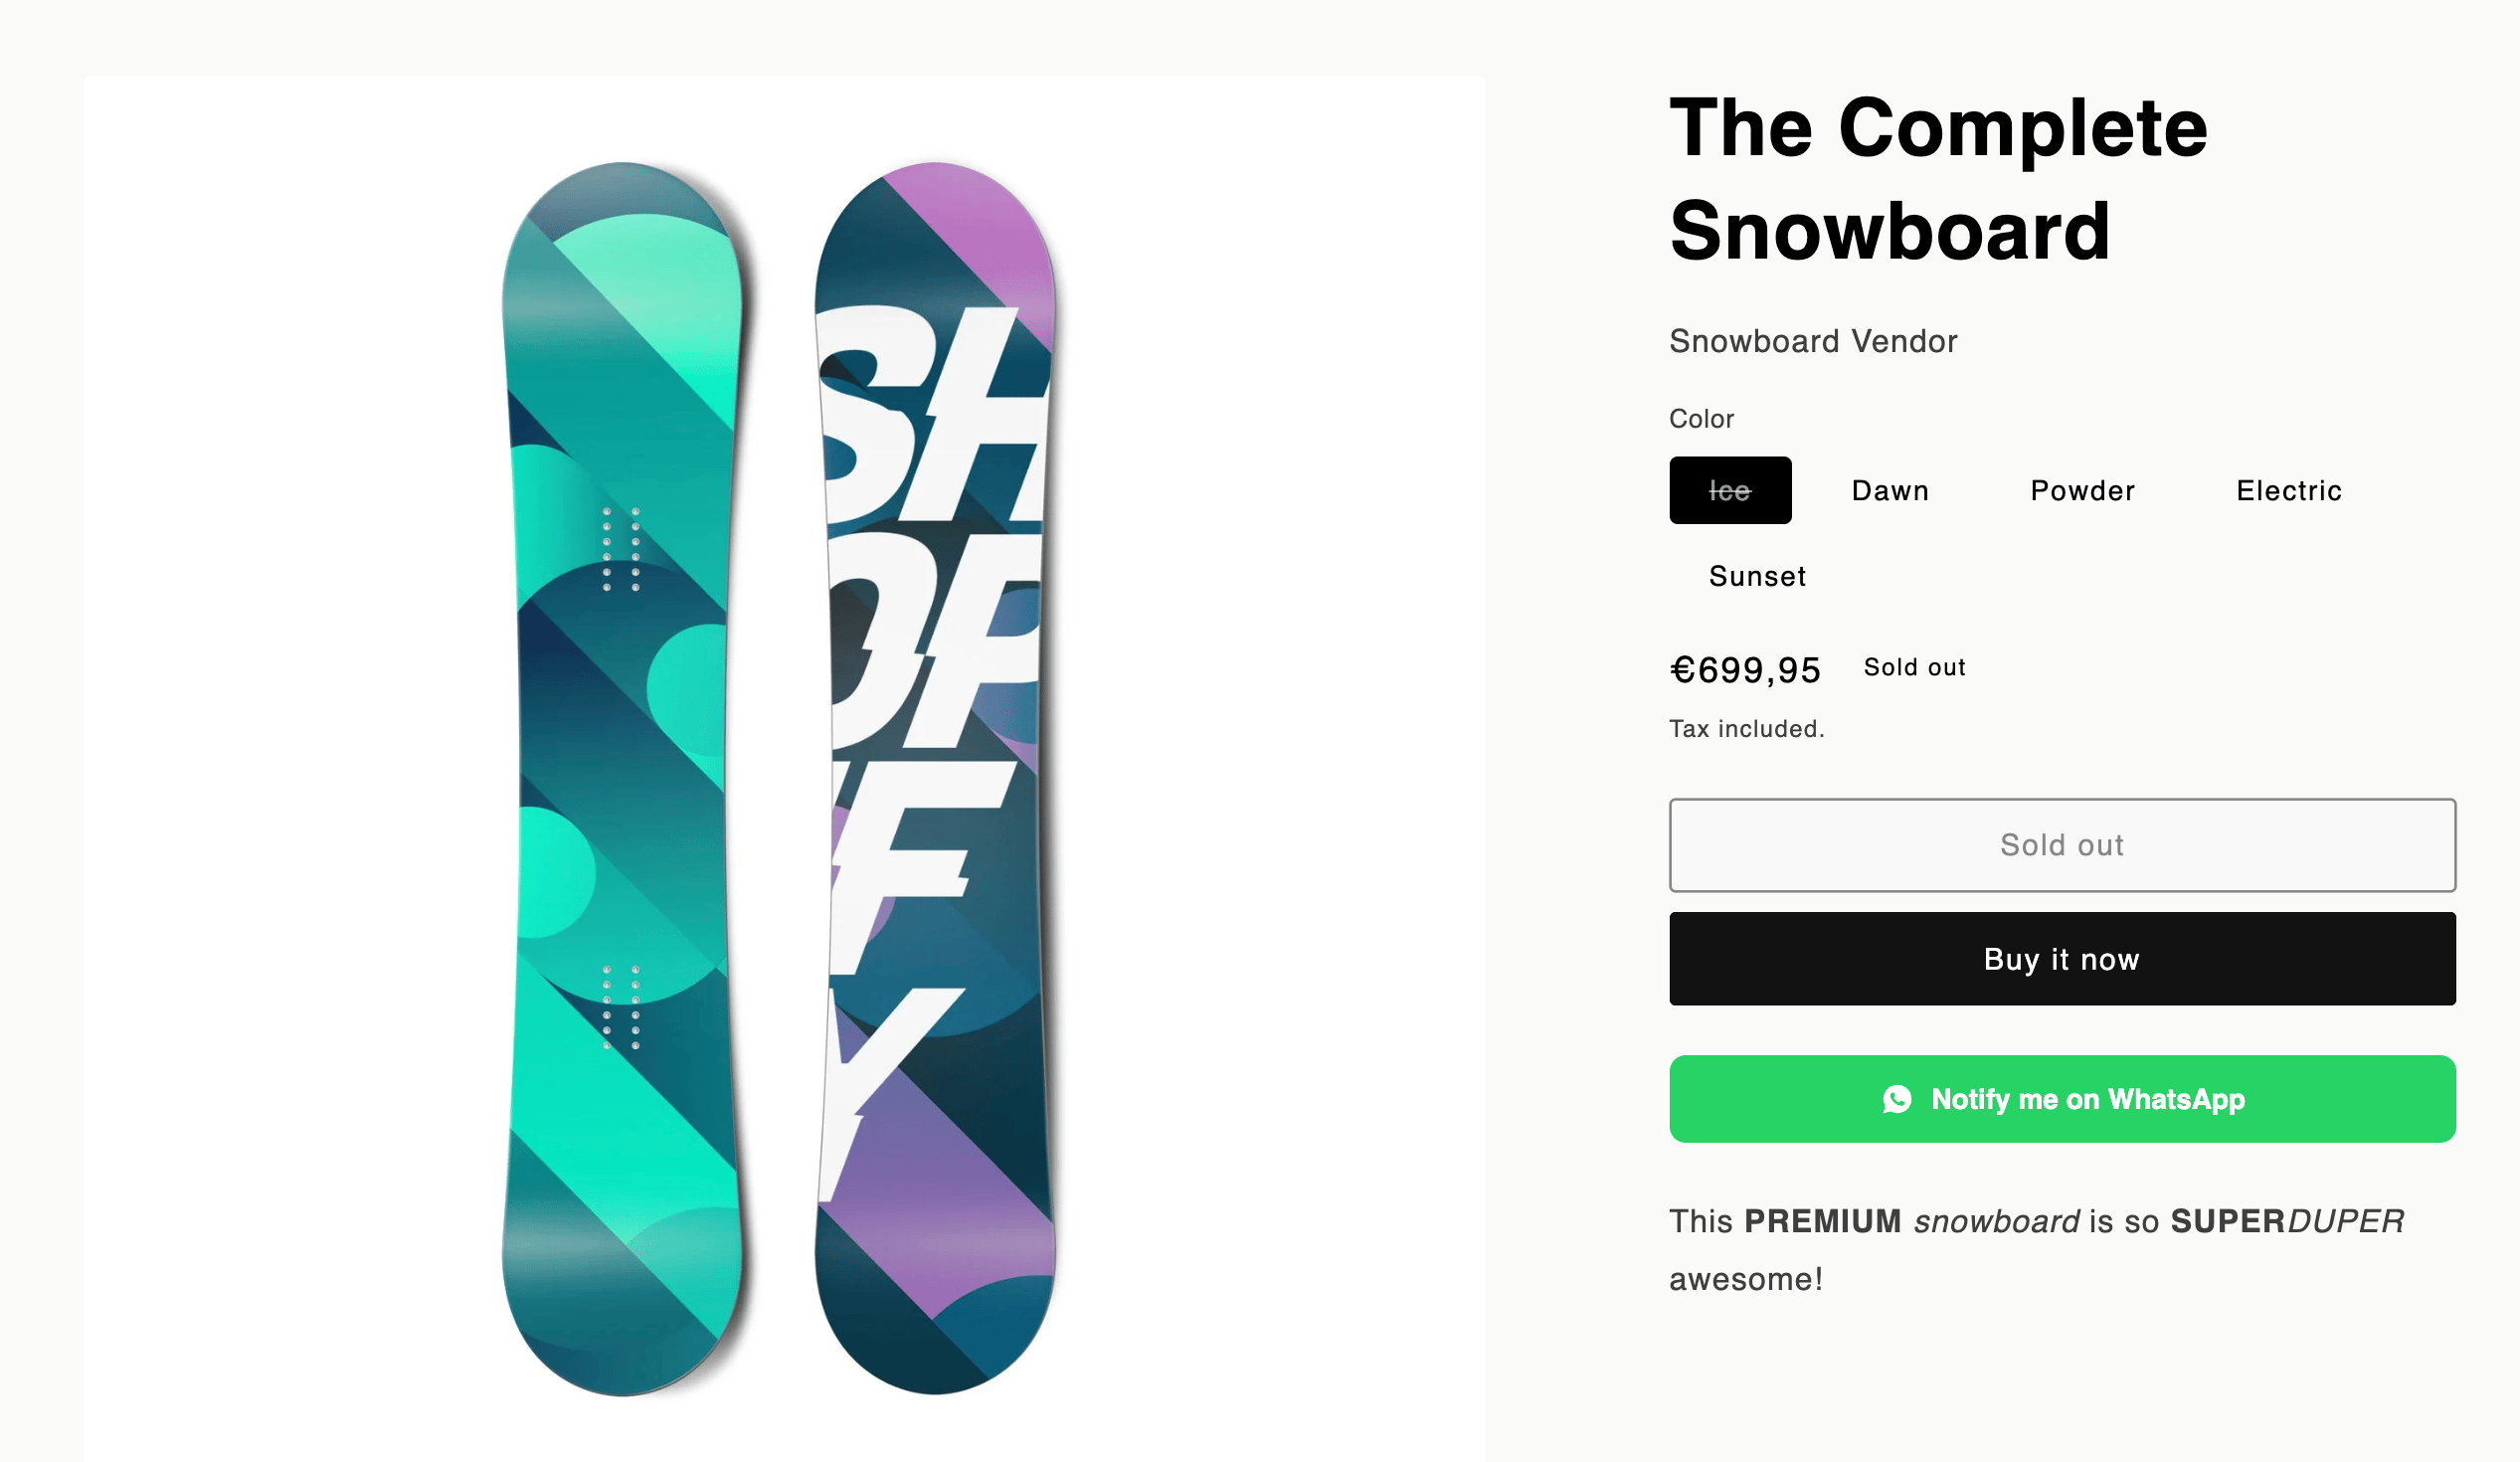
The back-in-stock button shows on a product page when the variant the shopper selects is sold out. The shopper clicks the button, gives a phone number and agrees to one WhatsApp message. When the variant is back in stock, TextYess starts your flow on the "Product Back in Stock" trigger once for each shopper on the list.
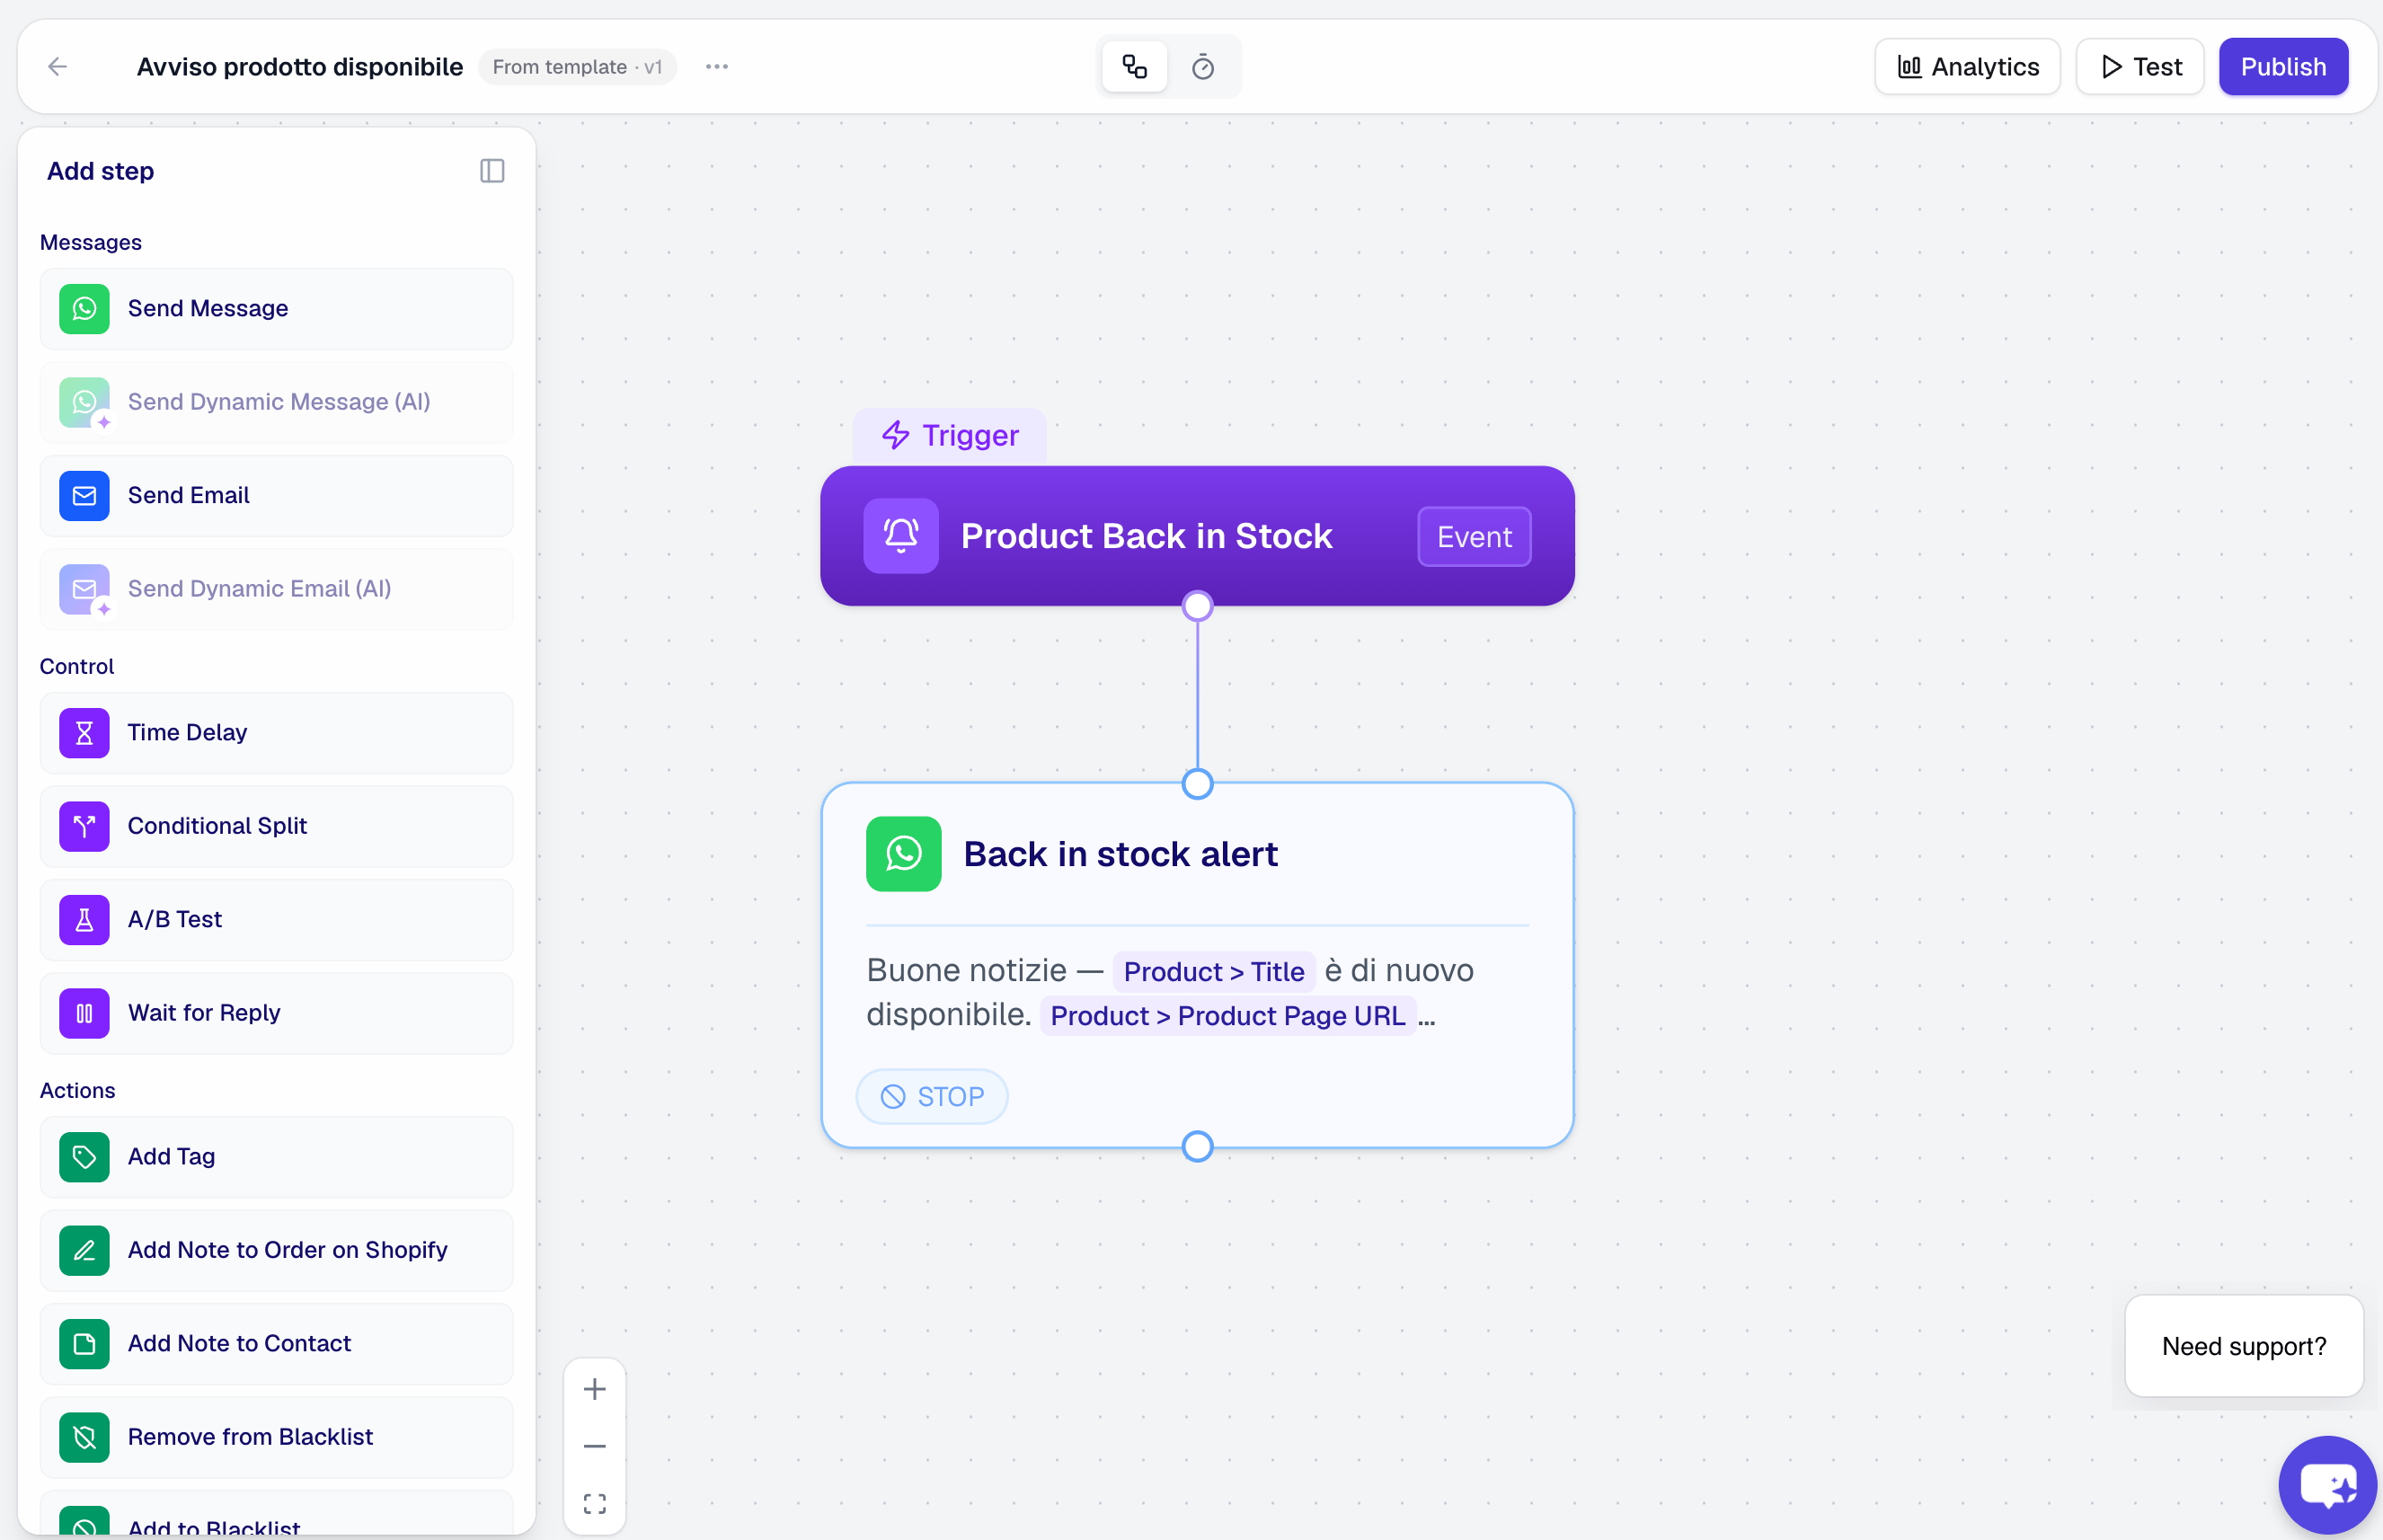
 The alert is sent by a flow. Activate a flow with the "Product Back in Stock" trigger before you install the button. Until a flow is active, shoppers wait on the list. They get the message on the first restock after the flow is active.
 ## Two ways to install
| | Theme editor | Code snippet |
| ------------------ | -------------------------- | ------------------------------ |
| Theme | Online Store 2.0 only | every theme |
| Changes theme code | no | yes |
| Colors come from | "Widget brand style" | the back-in-stock configurator |
| Button text | the shopper's own language | the text you write |
## Install from the theme editor
This method changes no theme code. It needs an Online Store 2.0 theme.
In TextYess, click "Growth Tool Kit" in the menu. On the "Back-in-stock button" card, click "Set up the button". In the "Install" card, click "Open Shopify Theme Editor".
Shopify opens your product template. The "TextYess Back in Stock" block is already in the main section. It is not saved yet.
Drag the block under the "Add to cart" button. Click "Save".
If the block is not there, open the "Apps" section of the product template and add "TextYess Back in Stock". Shopify always shows this name in English.
You can switch off the "Ask on WhatsApp" button. You can also write your own consent line. Both settings are on the right, under the block name.
In the editor, open a product that has a sold-out variant. The button shows under "Add to cart". On a variant that is in stock, only a grey note stays. Shoppers never see that note.
The block takes its colors, corner radius, button shape and text size from "Widget brand style" in the Growth Tool Kit. It does not use the colors and the texts in the back-in-stock configurator: those belong to the code snippet. The block writes the button texts in the shopper's own language.
## Install with the code snippet
Use this method when your theme is older, or when you want the button somewhere the block cannot go. The block goes on the product template only. Make a backup of your theme before you edit it.
In TextYess, click "Growth Tool Kit" in the menu. On the "Back-in-stock button" card, click "Set up the button". Change the button label, the colors and the consent line. The preview on the right uses a real product from your catalog.
In the "Install" card, under "Install with code", click "Copy snippet". The snippet carries your store id, your texts and your colors.
In Shopify, open "Online Store", then "Themes". Click the three dots on your theme, then "Edit code".
Open the file that renders the buy buttons on the product page. Common names are `main-product.liquid` and `buy-buttons.liquid`. Paste the snippet after the "Add to cart" button, then click "Save".
If you cannot find the buttons, press **cmd + F** on Mac or **ctrl + F** on Windows and search for `cart`.
Open a product that has a sold-out variant. The button shows under the disabled "Add to cart" button. On a variant that is in stock, the button does not show.
If the button never shows on a sold-out product, the snippet is in a file that does not know which product the page shows. Move it into the product template, next to the "Add to cart" button.
If you installed the snippet before September 2026, copy it again. The older snippet does not follow the variant the shopper selects.
## What shoppers see
At first the product page shows the "Notify me on WhatsApp" button. It stands next to "Ask on WhatsApp" when you keep that second button on. The phone field and the consent line open on the first click.
The button follows the variant on the page. A shopper who switches from an in-stock variant to a sold-out one sees the button right away.
If a page has the block and the snippet, the shopper sees only the snippet. The snippet keeps your own colors and your own consent line.
## What shoppers agree to
The consent line under the button is a service consent for one alert. It does not add the shopper to your marketing list, and it does not change their marketing opt-in. You can edit the wording in the configurator, or in the block settings.
## Two ways to install
| | Theme editor | Code snippet |
| ------------------ | -------------------------- | ------------------------------ |
| Theme | Online Store 2.0 only | every theme |
| Changes theme code | no | yes |
| Colors come from | "Widget brand style" | the back-in-stock configurator |
| Button text | the shopper's own language | the text you write |
## Install from the theme editor
This method changes no theme code. It needs an Online Store 2.0 theme.
In TextYess, click "Growth Tool Kit" in the menu. On the "Back-in-stock button" card, click "Set up the button". In the "Install" card, click "Open Shopify Theme Editor".
Shopify opens your product template. The "TextYess Back in Stock" block is already in the main section. It is not saved yet.
Drag the block under the "Add to cart" button. Click "Save".
If the block is not there, open the "Apps" section of the product template and add "TextYess Back in Stock". Shopify always shows this name in English.
You can switch off the "Ask on WhatsApp" button. You can also write your own consent line. Both settings are on the right, under the block name.
In the editor, open a product that has a sold-out variant. The button shows under "Add to cart". On a variant that is in stock, only a grey note stays. Shoppers never see that note.
The block takes its colors, corner radius, button shape and text size from "Widget brand style" in the Growth Tool Kit. It does not use the colors and the texts in the back-in-stock configurator: those belong to the code snippet. The block writes the button texts in the shopper's own language.
## Install with the code snippet
Use this method when your theme is older, or when you want the button somewhere the block cannot go. The block goes on the product template only. Make a backup of your theme before you edit it.
In TextYess, click "Growth Tool Kit" in the menu. On the "Back-in-stock button" card, click "Set up the button". Change the button label, the colors and the consent line. The preview on the right uses a real product from your catalog.
In the "Install" card, under "Install with code", click "Copy snippet". The snippet carries your store id, your texts and your colors.
In Shopify, open "Online Store", then "Themes". Click the three dots on your theme, then "Edit code".
Open the file that renders the buy buttons on the product page. Common names are `main-product.liquid` and `buy-buttons.liquid`. Paste the snippet after the "Add to cart" button, then click "Save".
If you cannot find the buttons, press **cmd + F** on Mac or **ctrl + F** on Windows and search for `cart`.
Open a product that has a sold-out variant. The button shows under the disabled "Add to cart" button. On a variant that is in stock, the button does not show.
If the button never shows on a sold-out product, the snippet is in a file that does not know which product the page shows. Move it into the product template, next to the "Add to cart" button.
If you installed the snippet before September 2026, copy it again. The older snippet does not follow the variant the shopper selects.
## What shoppers see
At first the product page shows the "Notify me on WhatsApp" button. It stands next to "Ask on WhatsApp" when you keep that second button on. The phone field and the consent line open on the first click.
The button follows the variant on the page. A shopper who switches from an in-stock variant to a sold-out one sees the button right away.
If a page has the block and the snippet, the shopper sees only the snippet. The snippet keeps your own colors and your own consent line.
## What shoppers agree to
The consent line under the button is a service consent for one alert. It does not add the shopper to your marketing list, and it does not change their marketing opt-in. You can edit the wording in the configurator, or in the block settings.