> ## Documentation Index
> Fetch the complete documentation index at: https://docs.textyess.com/llms.txt
> Use this file to discover all available pages before exploring further.

# Onsite Widget installation

> Install the TextYess AI Shopping Assistant directly on your website. Unlike the WhatsApp bubble, this onsite widget provides a full-featured chat experience with product recommendations, cart integration, and more.

<Note>
  Looking for the WhatsApp Bubble instead? Check out the [WhatsApp Bubble installation guide](/widget-installation-shopify).
</Note>

The Onsite Widget is a powerful AI Shopping Assistant that runs directly on your website. It differs from the WhatsApp bubble by providing:

* **Full chat experience** with a centered modal dialog
* **Product carousel** with variant selection
* **Shopify cart integration** for seamless add-to-cart functionality
* **Persistent conversations** across page navigation
* **Customizable appearance** with colors, banners, and positioning

<Steps>
  <Step title="Customize your widget appearance">
    Click on the "Growth tool kit" section of the menu. From there select the Onsite Widget integration block and personalize your widget.

    You can customize:

    * **Colors**: Background, bubble, and icon colors
    * **Text**: Dialog title, welcome message, and bubble text
    * **Position**: Bottom-right corner or right-center of the screen
    * **Banner image**: Display a promotional image at the top of the chat
    * **Popular questions**: Suggested questions for customers to ask
  </Step>

  <Step title="Get the code snippet">
    From there you will find the code snippet to insert into your Shopify theme. <br />
    The code will look something like this:

    ```html theme={null}
    <script
      type="module"
      src="https://cdn.textyess.com/v2/textyess-widget-components/textyess-widget-components.esm.js"
      defer
    ></script>
    <textyess-ai-widget
      organization_id="your_organization_id"
      language="en"
    />
    ```

    <Note>
      The onsite widget uses the `<textyess-ai-widget>` tag, which is different from the WhatsApp bubble widget (`<textyess-bubble-widget>`).
    </Note>
  </Step>

  <Step title="Go to the Online store section">
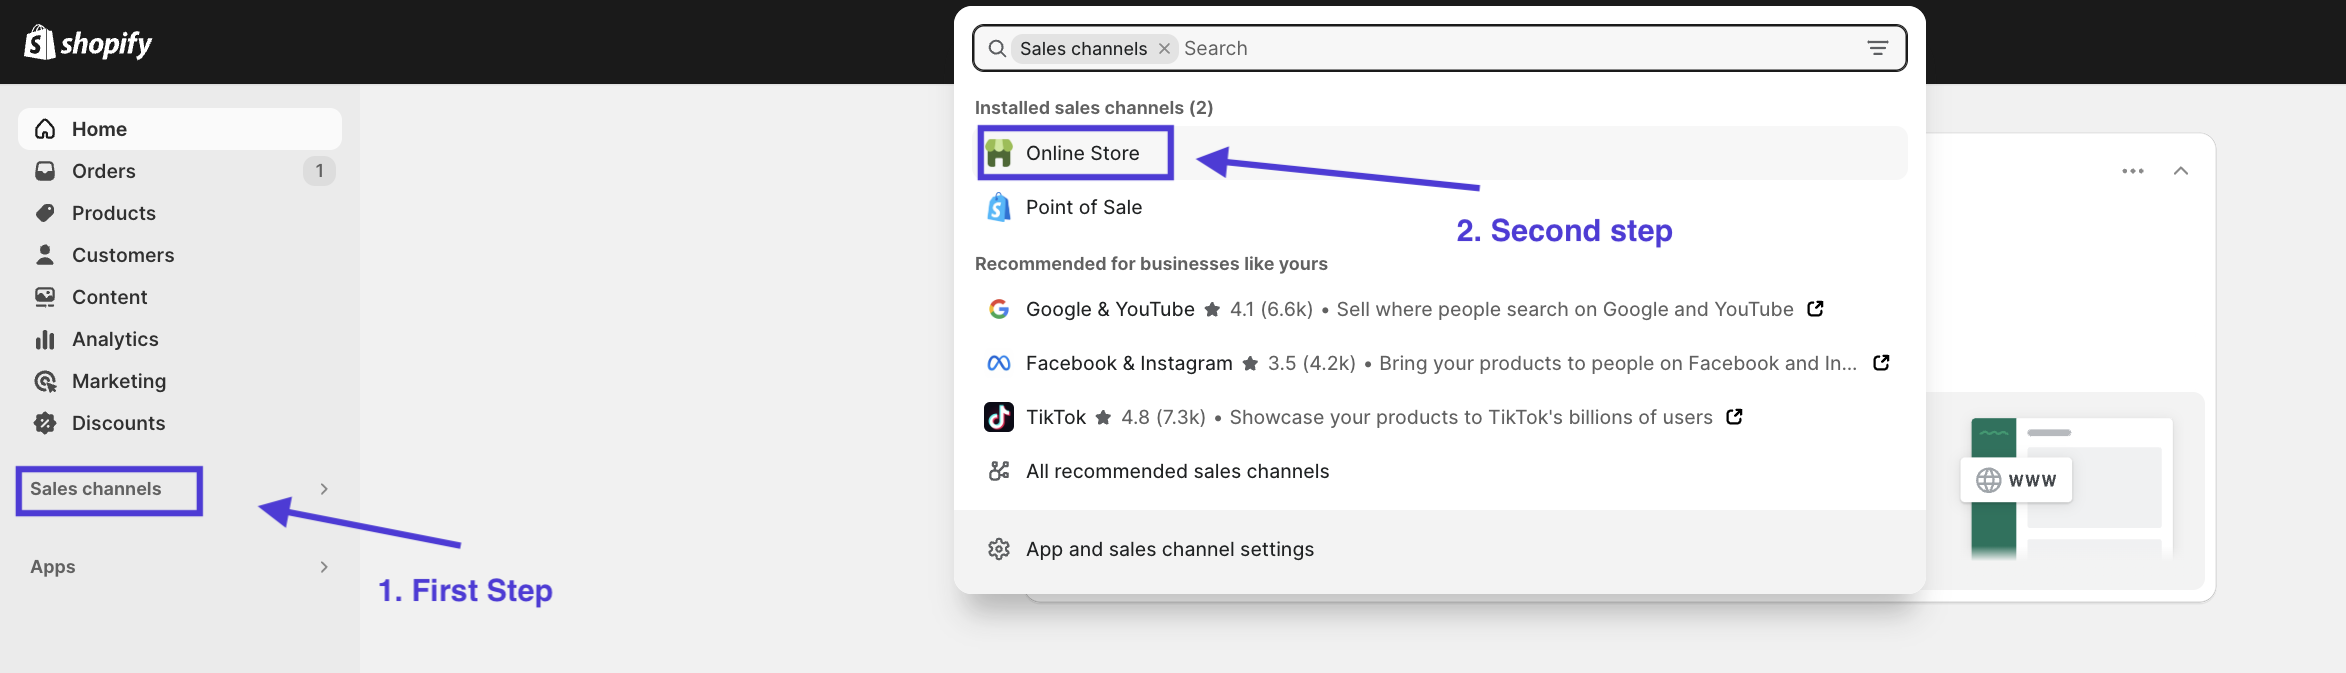
    Once inside your store click on "Sales channels" from the menu on the right. <br />

    A pop-up will appear at the top. From there click on "Online store"
    <Frame>
      <img src="https://mintcdn.com/textyess/CVMciMMYq5u5Kcmp/images/first_step.png?fit=max&auto=format&n=CVMciMMYq5u5Kcmp&q=85&s=263ee852b03f251b9663c85413fb1e69" width="2346" height="673" data-path="images/first_step.png" />
    </Frame>
  </Step>

  <Step title="Open the Theme editor">
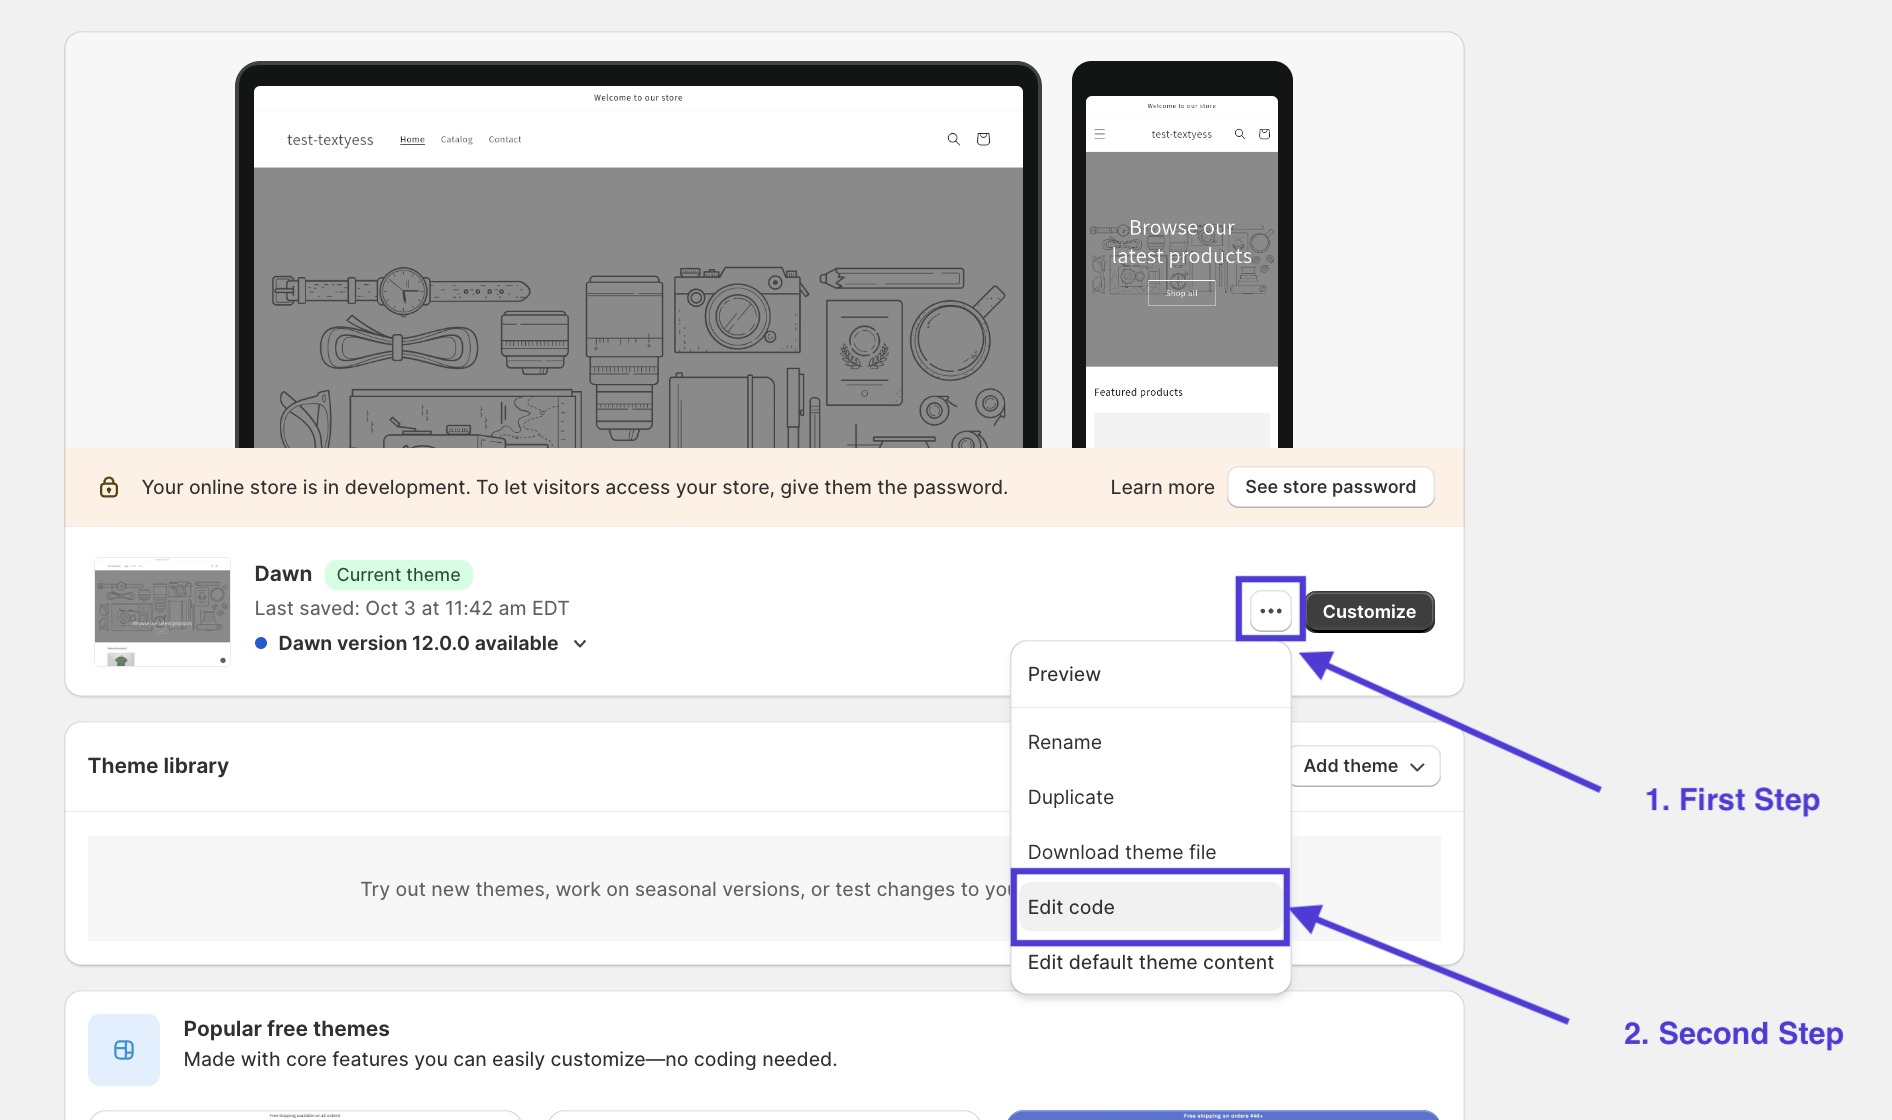
    Opening the theme editor is very simple. Just click on the three dots of the theme you want to update. Then click on "Edit code". <br />

    <Tip> Before proceeding we strongly recommend that you make backups of your current theme. To do this, click on the three dots, then click on "Duplicate" and/or "Download theme file."</Tip>

    <Frame>
      <img src="https://mintcdn.com/textyess/CVMciMMYq5u5Kcmp/images/second_step.png?fit=max&auto=format&n=CVMciMMYq5u5Kcmp&q=85&s=42838096c44929d1b93e488979eab6b0" width="1892" height="1120" data-path="images/second_step.png" />
    </Frame>
  </Step>

  <Step title="Edit the theme.liquid file">
    This might seem the scariest part for those without technical skills, but it is actually a very simple operation. <br />

    As a first thing you will notice that on the left side you have a bunch of files. Look for one called ***theme.liquid*** and click on it. <br />

    On the right, a file with codes will have opened for you. Don't worry, you don't need to know what it says. What you need to do now is scroll to the end of the file and look for the `</body>` tag <br />

    <Tip>
      If you cannot find the tag press **cmd + F** on Mac or **ctrl + F** on Windows. Then type `</body>` to find the tag within the search.
    </Tip>

    Once you find the tag, paste the code snippet you generated from TextYess (see step "Get the code snippet") **right before** the the `</body>` tag. Remember that if necessary you can create new lines by pressing the enter key in order to put space between the TextYess's code snippet and the `</body>` tag. <br />

    Your code should look something like this: <br />

    ```html theme={null}
    <script
      type="module"
      src="https://cdn.textyess.com/v2/textyess-widget-components/textyess-widget-components.esm.js"
      defer
    ></script>
    <textyess-ai-widget
      organization_id="your_organization_id"
      language="en"
    />

    </body>
    ```

    We are almost finished! <br />

    Now click the "Save" button in the upper right corner, then click the "Preview store" button to make sure the widget is displayed correctly. <br />

    <Check>Congratulations, we are live!</Check>

    <Frame>
      <img src="https://mintcdn.com/textyess/CVMciMMYq5u5Kcmp/images/third_step.png?fit=max&auto=format&n=CVMciMMYq5u5Kcmp&q=85&s=fea9756d0622b963af7ecda9db0d776b" width="2880" height="1800" data-path="images/third_step.png" />
    </Frame>
  </Step>
</Steps>

## Custom Trigger Element

You can trigger the AI chat from your own button or link instead of (or in addition to) the default floating bubble.

### Using a CSS Selector

Add a `trigger_selector` attribute pointing to your custom element, and optionally hide the default bubble:

```html theme={null}
<textyess-ai-widget
  organization_id="YOUR_ORG_ID"
  trigger_selector="#ask-ai-btn"
  hide_bubble="true"
></textyess-ai-widget>
```

Any element matching the selector will open the chat when clicked. You can use IDs (`#ask-ai-btn`), classes (`.open-chat`), or any valid CSS selector.

### Using the JavaScript API

For programmatic control, call methods directly on the widget element:

```html theme={null}
<script>
  // Wait for the widget to be ready, then call methods
  customElements.whenDefined('textyess-ai-widget').then(() => {
    const widget = document.querySelector('textyess-ai-widget');

    // Open the chat
    widget.open();

    // Close the chat
    widget.close();

    // Toggle open/closed
    widget.toggle();
  });
</script>
```

### Custom Trigger Options

| Attribute          | Type    | Default | Description                                             |
| ------------------ | ------- | ------- | ------------------------------------------------------- |
| `trigger_selector` | string  | —       | CSS selector for element(s) that open the chat on click |
| `hide_bubble`      | boolean | `false` | Hides the default floating bubble                       |

## Customization Options

You can customize the onsite widget by adding attributes to the `<textyess-ai-widget>` tag:

### Colors

| Attribute              | Description                   | Default   |
| ---------------------- | ----------------------------- | --------- |
| `background_color`     | Chat window background color  | `#7f1d1d` |
| `bubble_color`         | Floating bubble color         | `#7f1d1d` |
| `bubble_content_color` | Text/icon color inside bubble | `#ffffff` |
| `icon_color`           | Icon color in UI elements     | `#ffffff` |

### Position & Appearance

| Attribute          | Description                                              | Default        |
| ------------------ | -------------------------------------------------------- | -------------- |
| `bubble_position`  | Position of the bubble: `bottom-right` or `right-center` | `right-center` |
| `image_banner_url` | URL of banner image shown at top of chat                 | -              |
| `image_fit`        | How banner image scales: `contain` or `cover`            | `cover`        |

### Text & Content

| Attribute           | Description                           | Default |
| ------------------- | ------------------------------------- | ------- |
| `dialog_title`      | Title shown in the chat window header | -       |
| `welcome_message`   | Initial greeting message              | -       |
| `bubble_text`       | Text on the floating action bubble    | -       |
| `badge_text`        | Badge text (e.g., "NEW")              | -       |
| `popular_questions` | Suggested questions (comma-separated) | -       |

### Language

| Attribute  | Description                                | Default |
| ---------- | ------------------------------------------ | ------- |
| `language` | Language: `en` (English) or `it` (Italian) | `it`    |

### E-commerce

| Attribute          | Description                             | Default |
| ------------------ | --------------------------------------- | ------- |
| `show_add_to_cart` | Show "Add to Cart" buttons for products | `true`  |

### Example with customization

```html theme={null}
<script
  type="module"
  src="https://cdn.textyess.com/v2/textyess-widget-components/textyess-widget-components.esm.js"
  defer
></script>
<textyess-ai-widget
  organization_id="your_organization_id"
  language="en"
  dialog_title="Shopping Assistant"
  welcome_message="Hi! How can I help you today?"
  bubble_text="Need help?"
  background_color="#1e40af"
  bubble_color="#1e40af"
  bubble_position="bottom-right"
  show_add_to_cart="true"
/>
```