> ## Documentation Index
> Fetch the complete documentation index at: https://docs.textyess.com/llms.txt
> Use this file to discover all available pages before exploring further.
# Onsite Widget installation
> Install the TextYess AI Shopping Assistant directly on your WooCommerce website. Unlike the WhatsApp bubble, this onsite widget provides a full-featured chat experience with product recommendations and more.
Looking for the WhatsApp Bubble instead? Check out the [WhatsApp Bubble installation guide](/widget-installation-woocommerce).
The Onsite Widget is a powerful AI Shopping Assistant that runs directly on your website. It differs from the WhatsApp bubble by providing:
* **Full chat experience** with a centered modal dialog
* **Product carousel** with variant selection
* **Persistent conversations** across page navigation
* **Customizable appearance** with colors, banners, and positioning
Click on the "Growth tool kit" section of the menu. From there select the Onsite Widget integration block and personalize your widget.
You can customize:
* **Colors**: Background, bubble, and icon colors
* **Text**: Dialog title, welcome message, and bubble text
* **Position**: Bottom-right corner or right-center of the screen
* **Banner image**: Display a promotional image at the top of the chat
* **Popular questions**: Suggested questions for customers to ask
From there you will find the code snippet to insert into your WooCommerce theme.
The code will look something like this:
```html theme={null}
```
The onsite widget uses the `` tag, which is different from the WhatsApp bubble widget (``).
On WooCommerce (and any non-Shopify store) you must set `show_add_to_cart="false"`. The Add to Cart action is currently supported on Shopify only, so leaving it enabled on WooCommerce will surface a button that cannot complete the purchase.
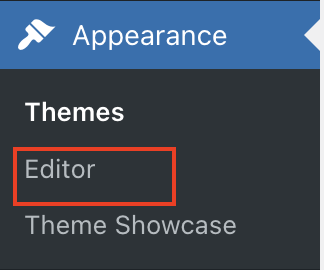
Once inside your store click on "Appearance" from the menu on the right.
From there click on "Editor"
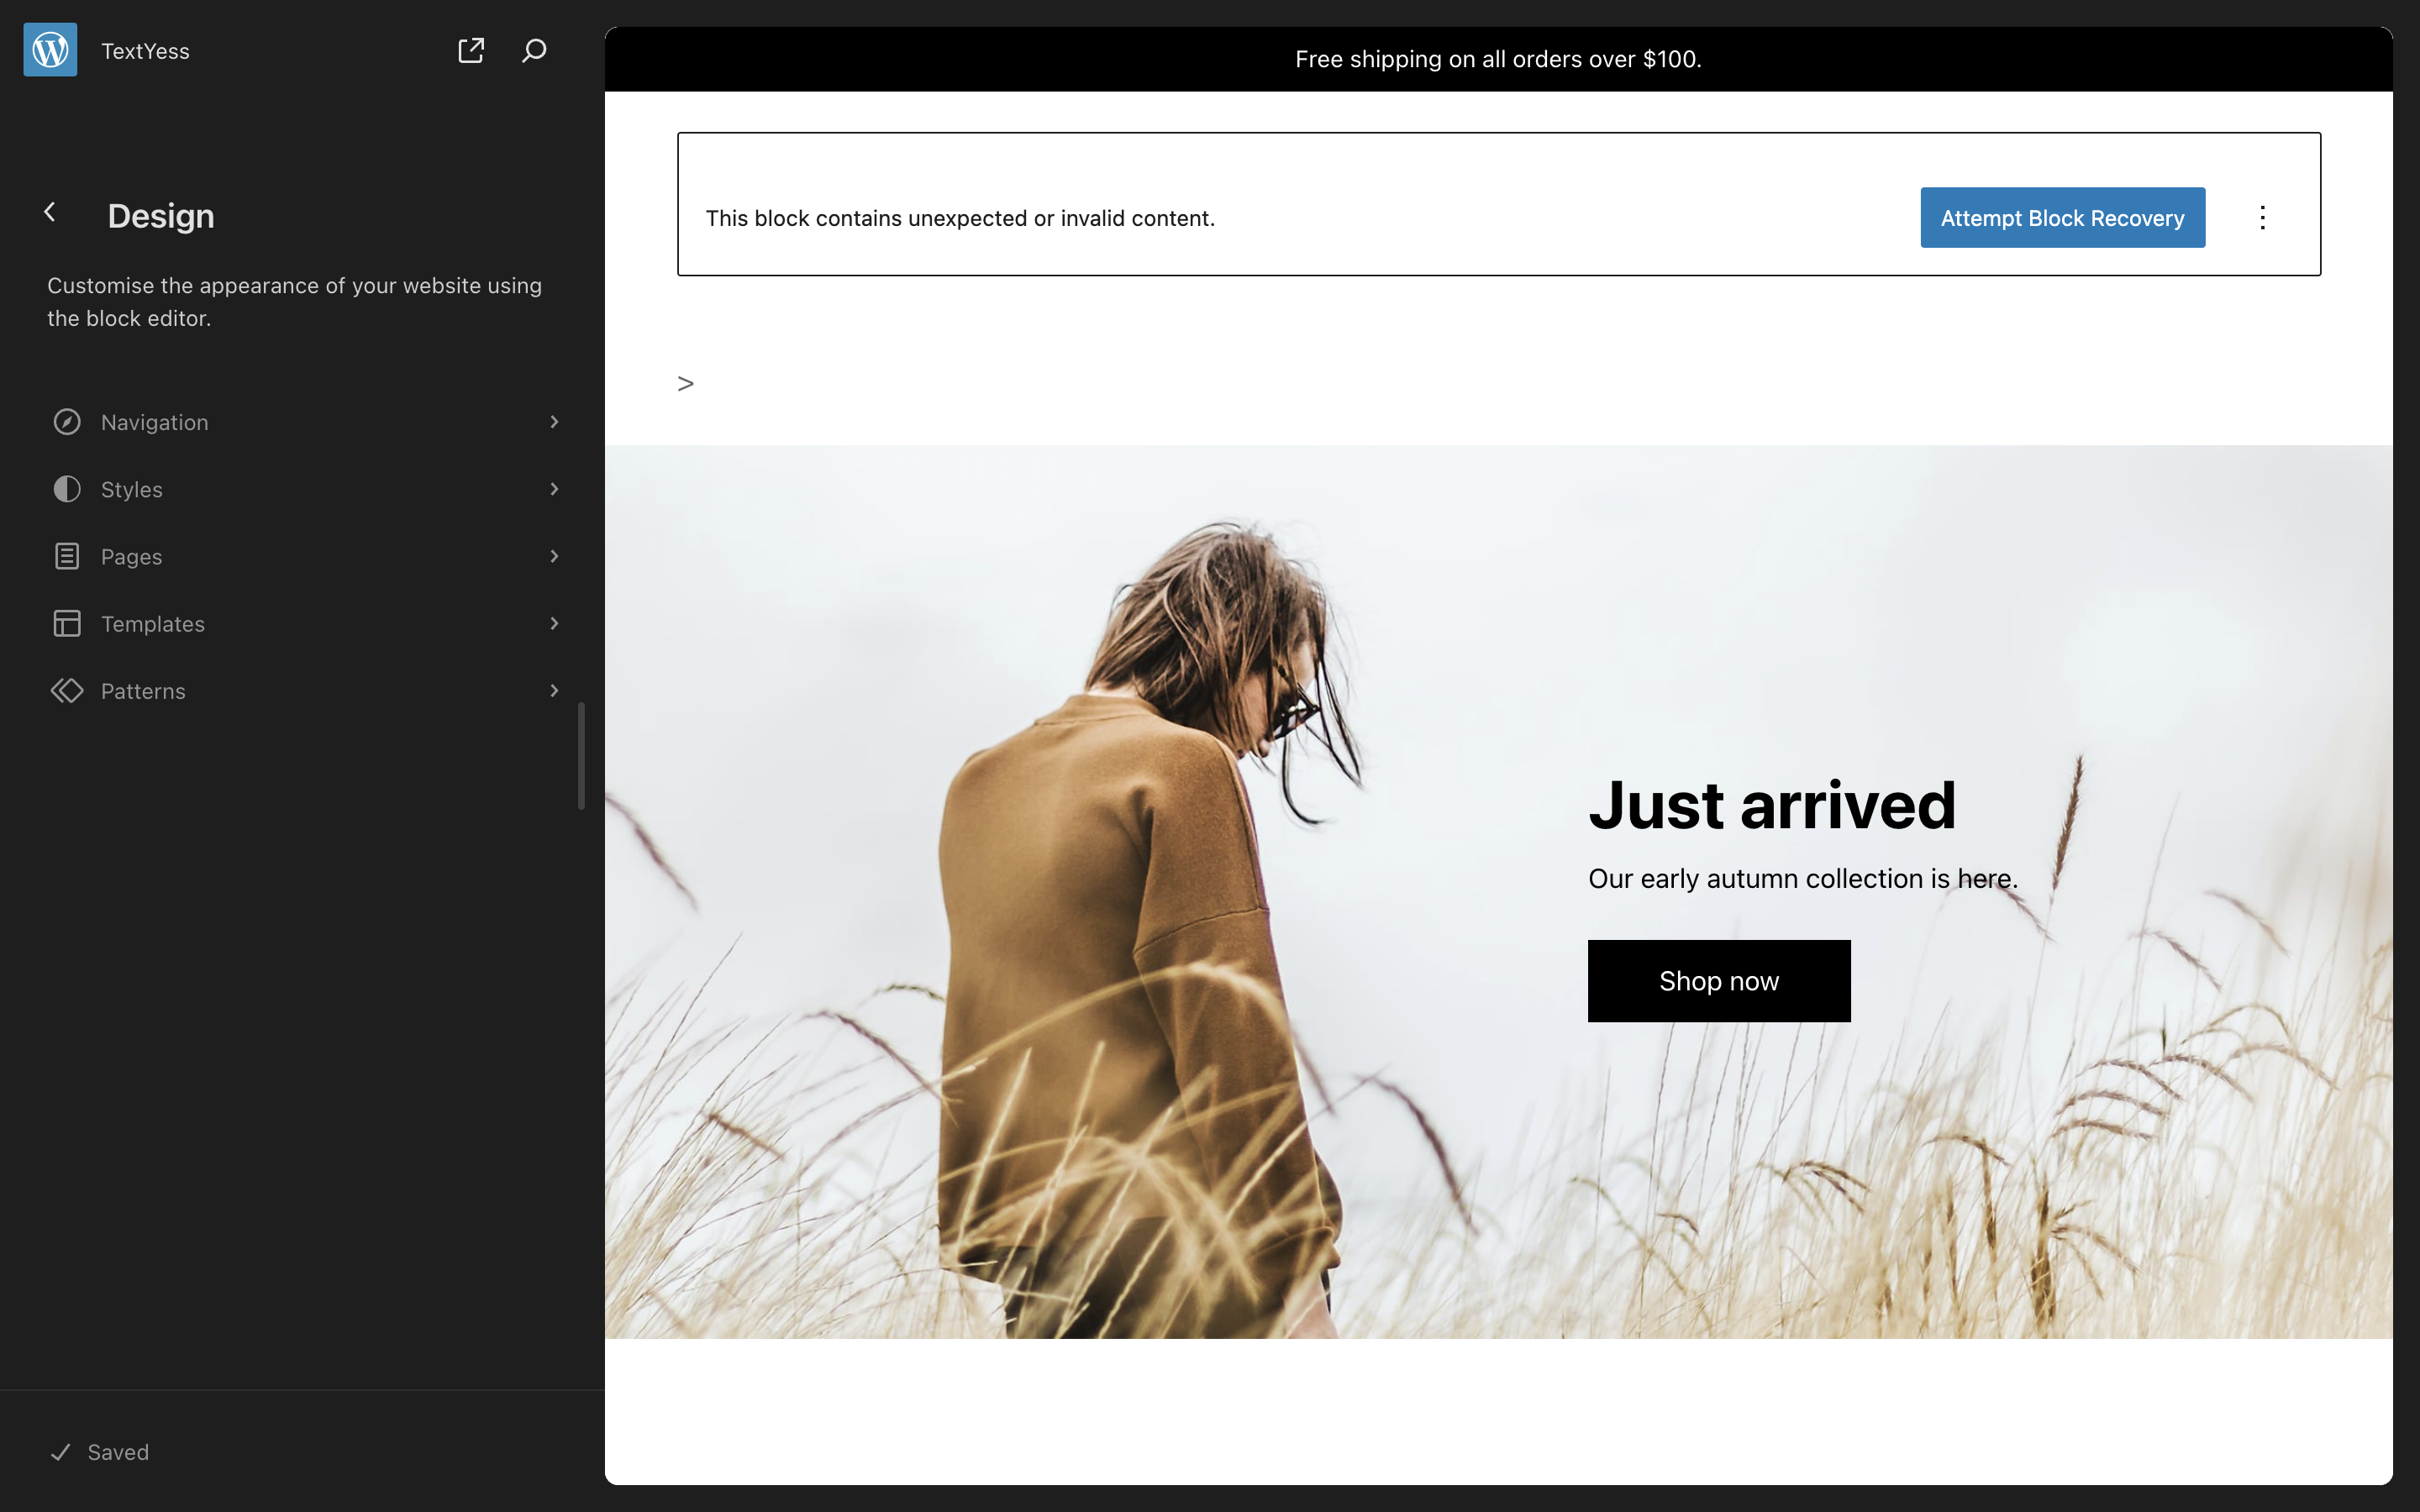
 Once opened the editor, you should see something like this. You will need to click the "Patterns"
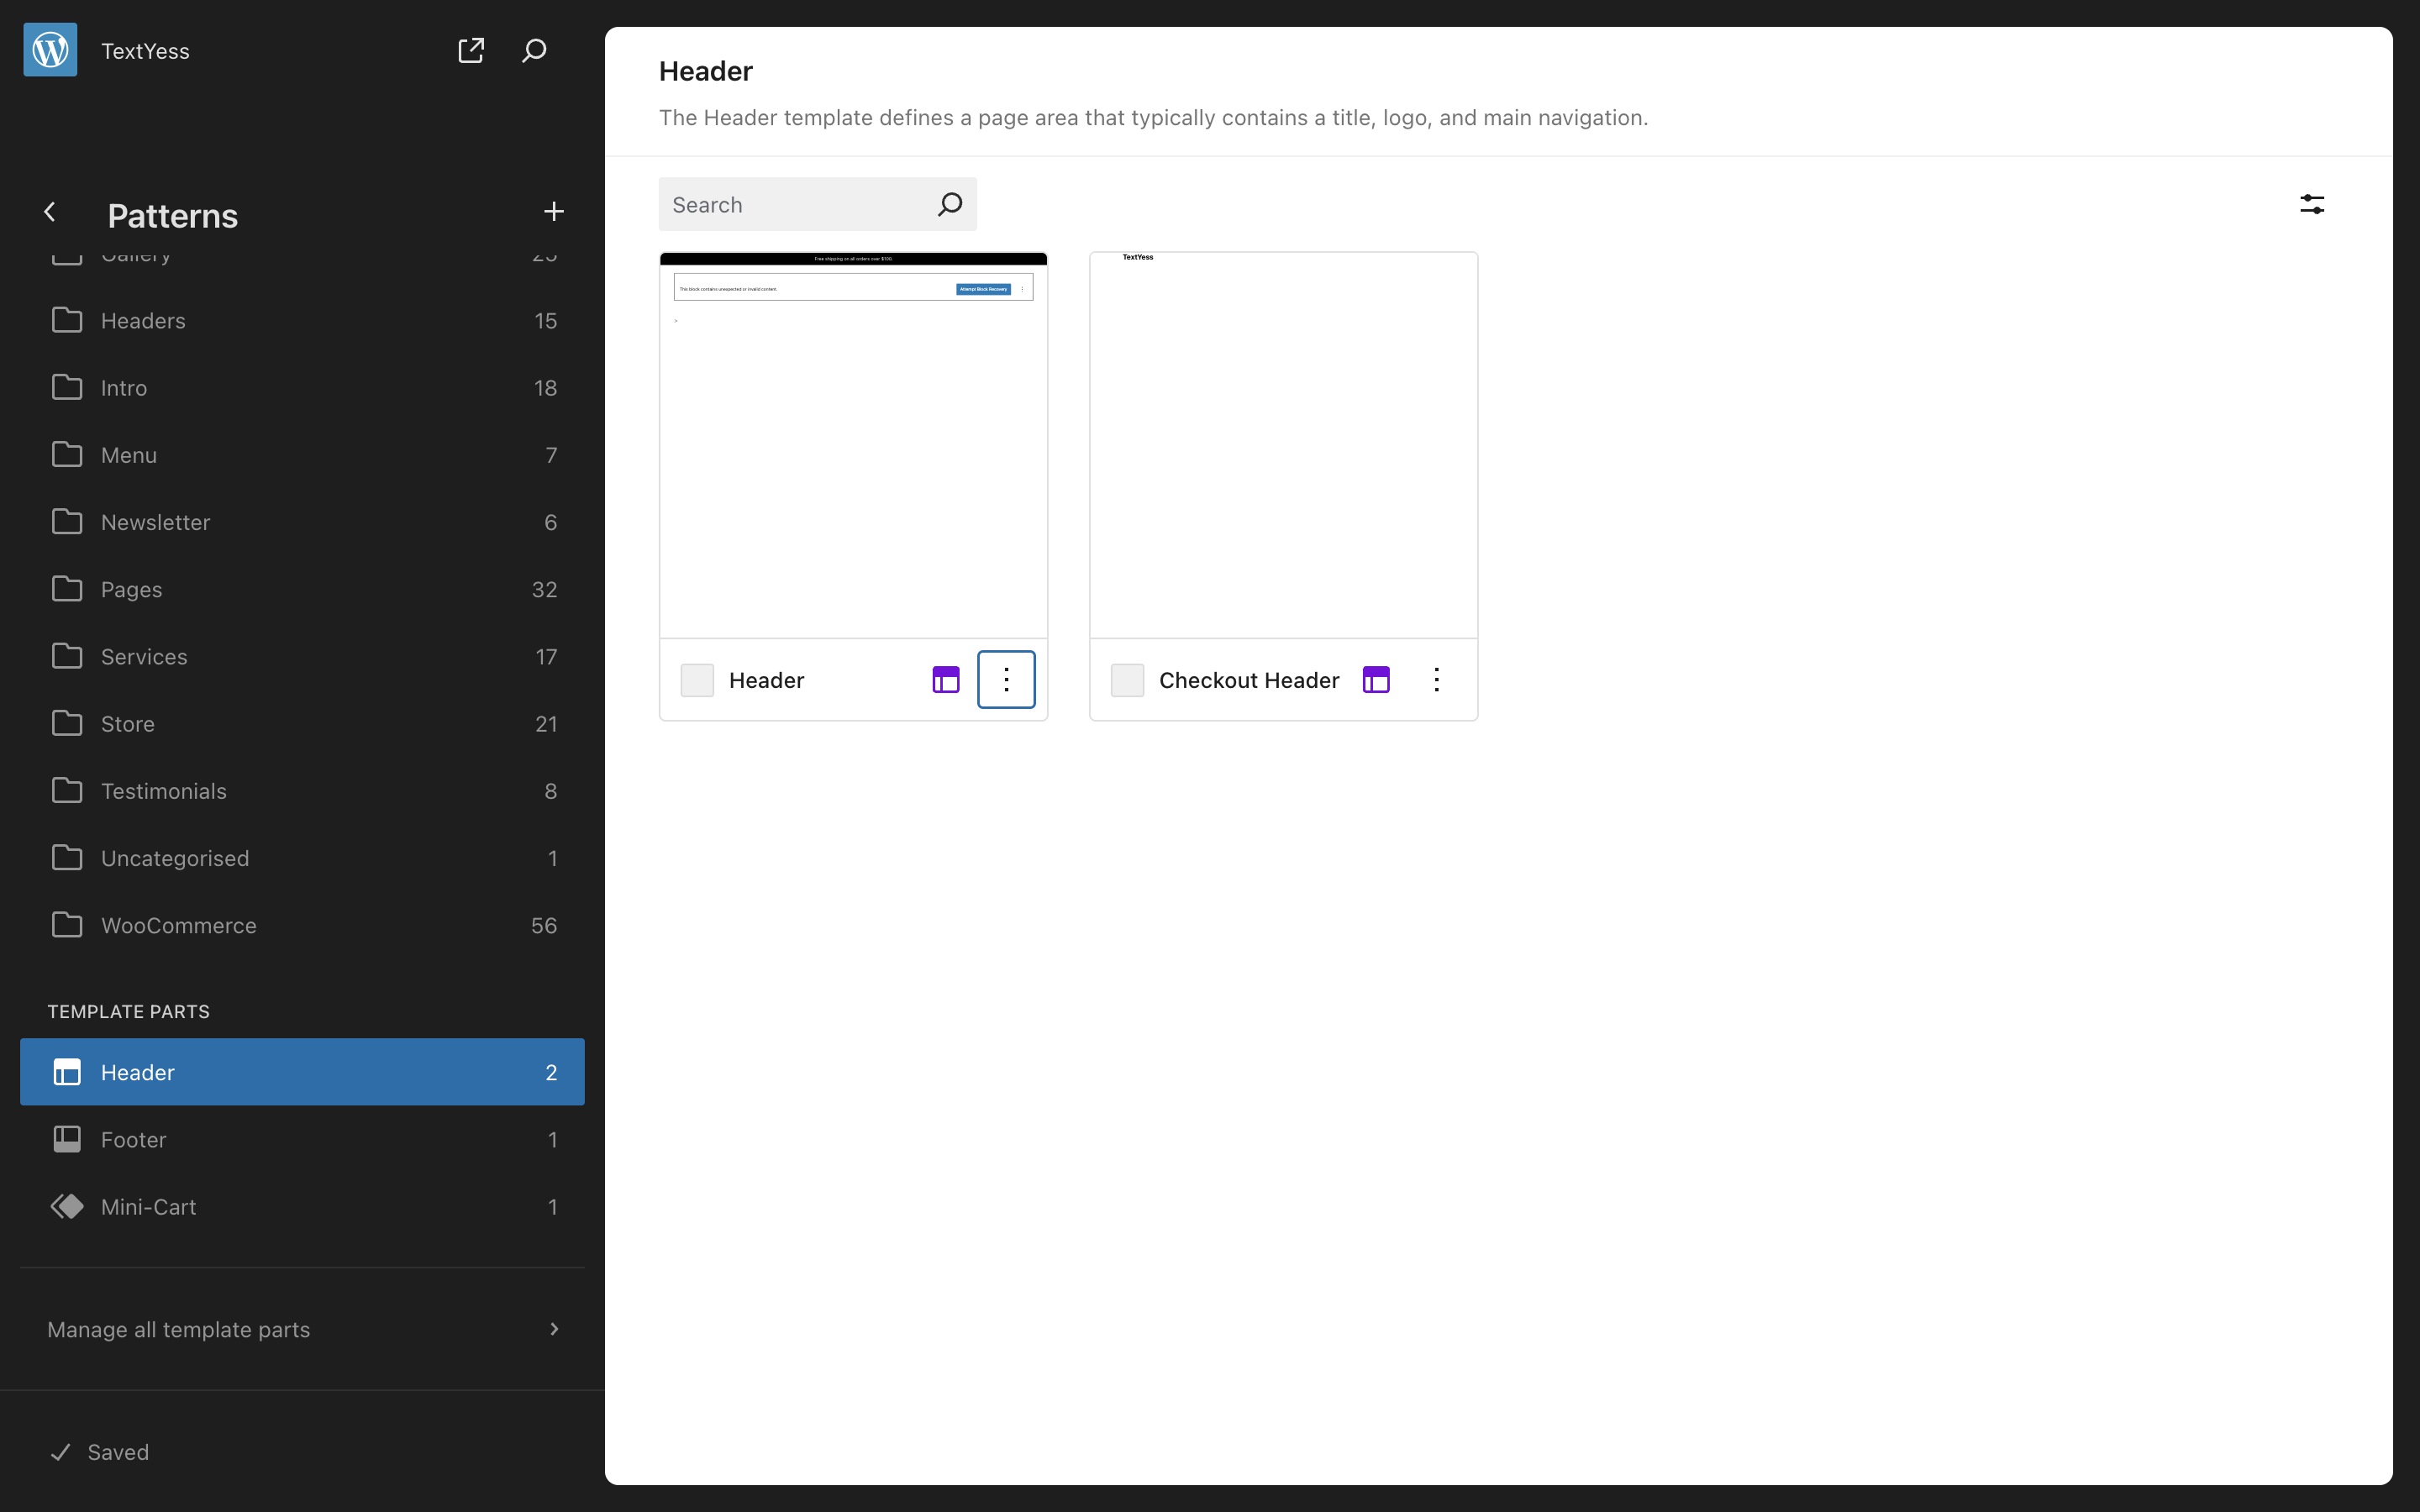
 Several patterns will be shown. You need to scroll down and select the one named "Header"
Once again, more than one header pattern may shown. Click the one in which you want to show the widget.
Before proceeding we strongly recommend that you duplicate the pattern that
you want to edit. To do this, click on the three dots, then click on
"Duplicate".
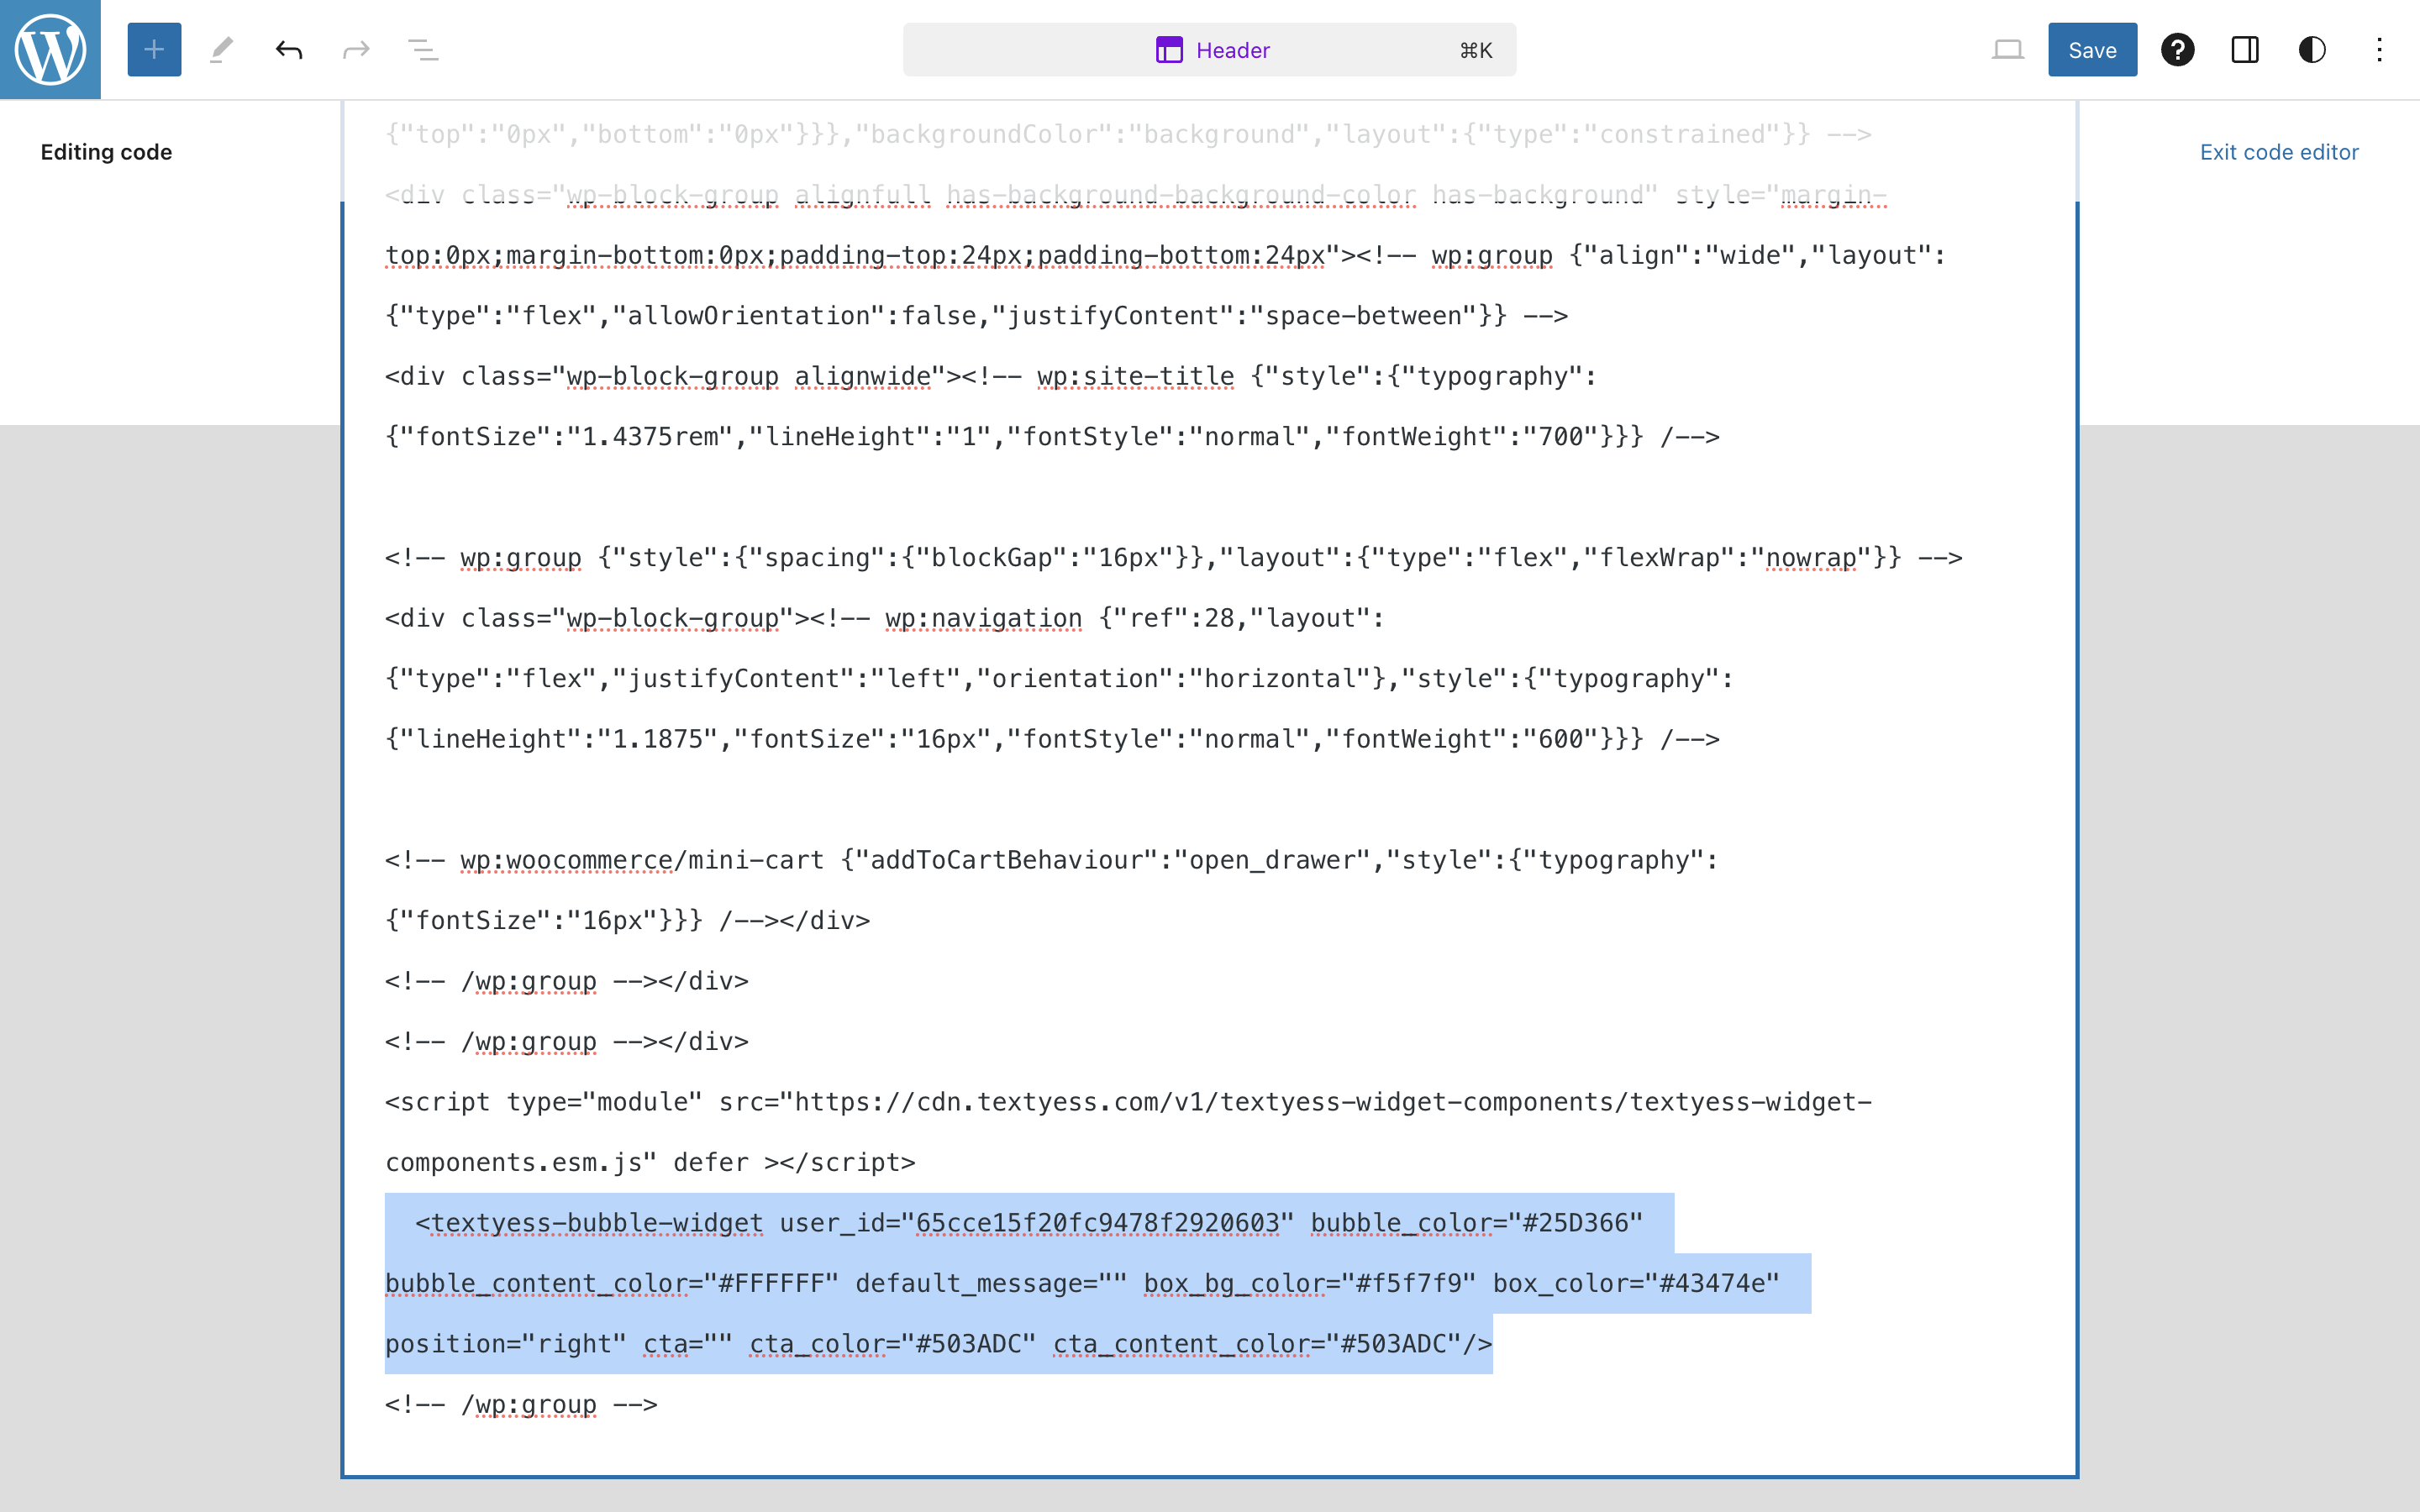
 Go to the bottom of the file and paste the code from step 2 right before the last ``
Once you have edited the code, click save in the upper right corner.
 Congratulations, we are live!
## Customization Options
You can customize the onsite widget by adding attributes to the `` tag:
### Colors
| Attribute | Description | Default |
| ---------------------- | ----------------------------- | --------- |
| `background_color` | Chat window background color | `#7f1d1d` |
| `bubble_color` | Floating bubble color | `#7f1d1d` |
| `bubble_content_color` | Text/icon color inside bubble | `#ffffff` |
| `icon_color` | Icon color in UI elements | `#ffffff` |
### Position & Appearance
| Attribute | Description | Default |
| ------------------ | -------------------------------------------------------- | -------------- |
| `bubble_position` | Position of the bubble: `bottom-right` or `right-center` | `right-center` |
| `image_banner_url` | URL of banner image shown at top of chat | - |
| `image_fit` | How banner image scales: `contain` or `cover` | `cover` |
### Text & Content
| Attribute | Description | Default |
| ------------------- | ------------------------------------- | ------- |
| `dialog_title` | Title shown in the chat window header | - |
| `welcome_message` | Initial greeting message | - |
| `bubble_text` | Text on the floating action bubble | - |
| `badge_text` | Badge text (e.g., "NEW") | - |
| `popular_questions` | Suggested questions (comma-separated) | - |
### Language
| Attribute | Description | Default |
| ---------- | ------------------------------------------ | ------- |
| `language` | Language: `en` (English) or `it` (Italian) | `it` |
### E-commerce
| Attribute | Description | Default |
| ------------------ | ----------------------------------------------------------------------------------------------------------------------- | ------- |
| `show_add_to_cart` | Show "Add to Cart" buttons for products. **Shopify only** — set to `false` on WooCommerce and other non-Shopify stores. | `true` |
### Example with customization
```html theme={null}
```
Congratulations, we are live!
## Customization Options
You can customize the onsite widget by adding attributes to the `` tag:
### Colors
| Attribute | Description | Default |
| ---------------------- | ----------------------------- | --------- |
| `background_color` | Chat window background color | `#7f1d1d` |
| `bubble_color` | Floating bubble color | `#7f1d1d` |
| `bubble_content_color` | Text/icon color inside bubble | `#ffffff` |
| `icon_color` | Icon color in UI elements | `#ffffff` |
### Position & Appearance
| Attribute | Description | Default |
| ------------------ | -------------------------------------------------------- | -------------- |
| `bubble_position` | Position of the bubble: `bottom-right` or `right-center` | `right-center` |
| `image_banner_url` | URL of banner image shown at top of chat | - |
| `image_fit` | How banner image scales: `contain` or `cover` | `cover` |
### Text & Content
| Attribute | Description | Default |
| ------------------- | ------------------------------------- | ------- |
| `dialog_title` | Title shown in the chat window header | - |
| `welcome_message` | Initial greeting message | - |
| `bubble_text` | Text on the floating action bubble | - |
| `badge_text` | Badge text (e.g., "NEW") | - |
| `popular_questions` | Suggested questions (comma-separated) | - |
### Language
| Attribute | Description | Default |
| ---------- | ------------------------------------------ | ------- |
| `language` | Language: `en` (English) or `it` (Italian) | `it` |
### E-commerce
| Attribute | Description | Default |
| ------------------ | ----------------------------------------------------------------------------------------------------------------------- | ------- |
| `show_add_to_cart` | Show "Add to Cart" buttons for products. **Shopify only** — set to `false` on WooCommerce and other non-Shopify stores. | `true` |
### Example with customization
```html theme={null}
```