> ## Documentation Index
> Fetch the complete documentation index at: https://docs.textyess.com/llms.txt
> Use this file to discover all available pages before exploring further.
# Setup Zendesk
> Learn how to setup Textyess into your Zendesk account!
### Navigate to the configuration page
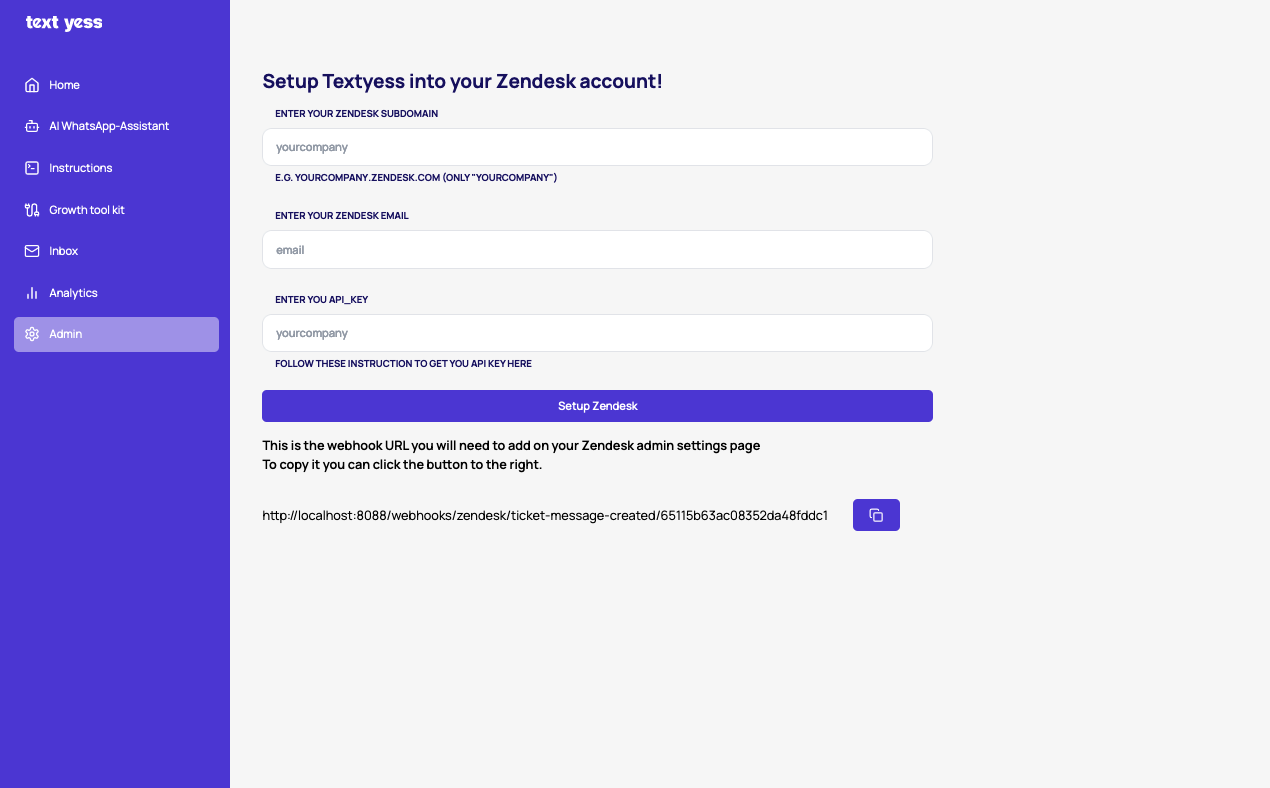
The first step is to connect your Zendesk account to TextYess.\
Open the **Zendesk Integration** page inside TextYess by navigating to [https://ai.textyess.com/integrations/zendesk](https://ai.textyess.com/integrations/zendesk).
 ### Create the API token
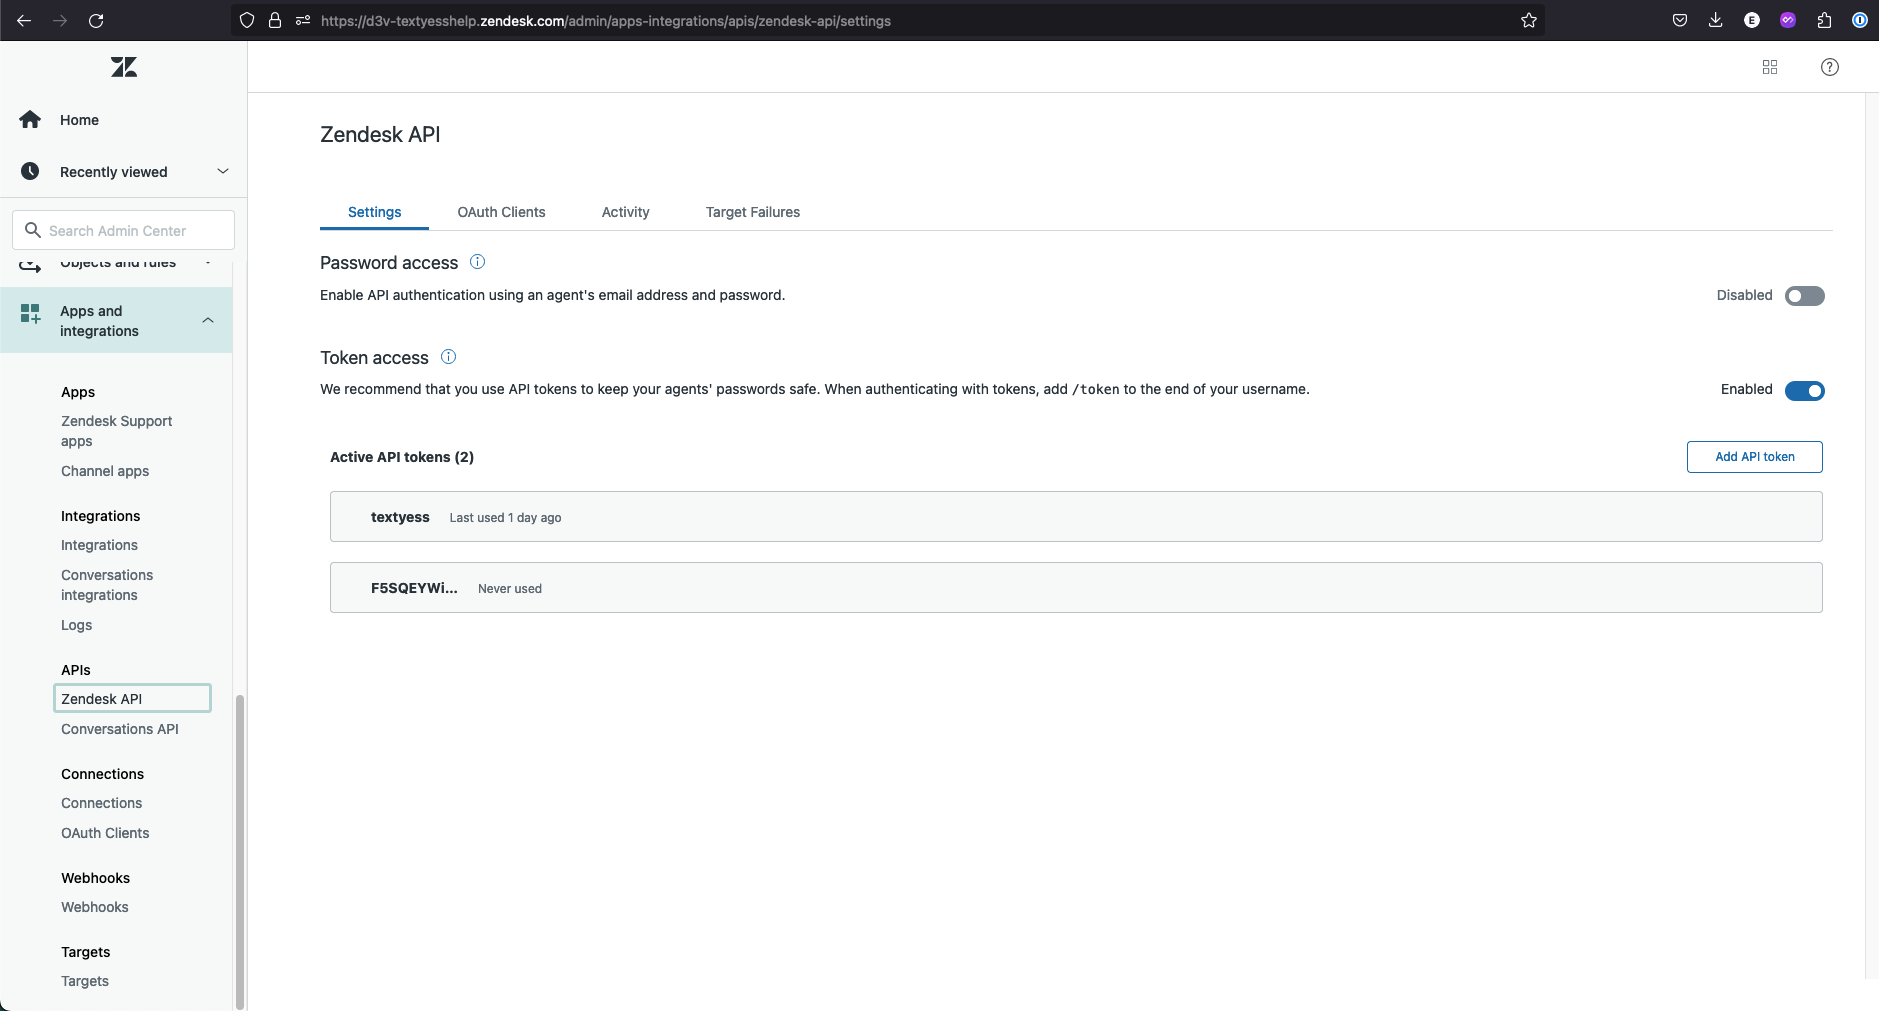
1. In Zendesk, click the **Admin (gear icon)** on the left sidebar.
2. Go to **Apps and Integrations → API → Zendesk API**.
3. Make sure the checkbox for **“Allow API token access”** is enabled.
4. Under **API Tokens**, click **Add API token**.
5. Add a name for the token, for example “TextYess Integration.”
6. Click **Copy** to save your token somewhere safe — Zendesk will only show it once.
7. Go back to **TextYess → Integrations → Zendesk**.
8. Paste your **Zendesk domain**, **admin email**, and **API token**, then click **Setup Zendesk**.
### Create the API token
1. In Zendesk, click the **Admin (gear icon)** on the left sidebar.
2. Go to **Apps and Integrations → API → Zendesk API**.
3. Make sure the checkbox for **“Allow API token access”** is enabled.
4. Under **API Tokens**, click **Add API token**.
5. Add a name for the token, for example “TextYess Integration.”
6. Click **Copy** to save your token somewhere safe — Zendesk will only show it once.
7. Go back to **TextYess → Integrations → Zendesk**.
8. Paste your **Zendesk domain**, **admin email**, and **API token**, then click **Setup Zendesk**.
 ### This will allow us to:
The app will automatically create a view named "TextYess" where all new conversations with the AI agent will be visible
The app then automatically will send all new replies / comments created from your Zendesk account to TextYess. Remember that sending messages from Zendesk's ticket page will stop the AI to reply to the customer!
## On every new WhatsApp conversation:
1. TextYess automatically creates a **customer in Zendesk** with:
* Email: `zendesk_@textyess.com`
* Their phone number attached to their profile
2. A **ticket is created with status: “solved.”**\
This indicates the AI is actively managing the conversation.
3. If the **customer replies,** Zendesk automatically reopens the ticket as **“open.”**\
The AI detects the new message and sends a response.
4. After the AI responds, the ticket is automatically updated back to **”solved.”**
5. If a **human agent** sends a message to the customer from Zendesk, **the AI immediately stops replying**, , and the conversation is handled exclusively by the support team.
### Multi-account setup (multiple TextYess organizations)
If you connect multiple TextYess organizations (e.g. different markets) to the **same Zendesk instance**, each organization needs its own webhook trigger so that replies are routed to the correct WhatsApp account.
#### How it works
Each TextYess organization automatically tags its tickets with:
* `textyess_orgid_{organization_id}` — a unique, stable identifier for the organization
* `textyess_org_{company_name}` — a human-readable label (e.g. `textyess_org_velasca_uk`)
You can find the `organization_id` in the webhook URL shown on each TextYess organization's Zendesk integration page.
#### Step-by-step
1. In Zendesk, go to **Admin → Objects and rules → Business rules → Triggers**.
2. For **each TextYess organization**, create a trigger:
* **Name:** e.g. “TextYess - Velasca UK”
* **Conditions (Meet ALL):**
* `Tags` → `Contains at least one of the following` → `textyess_orgid_{organization_id}`
* `Comment` → `Is` → `Public`
* **Actions:**
* `Notify webhook` → select the webhook for that organization's URL
3. If you previously had a single trigger for all TextYess tickets, update it to use the org-specific tag, or disable it and create per-org triggers.
#### Important notes
* Only **new tickets** created after connecting will have the org tags. Existing tickets are unaffected.
* The `textyess_orgid_` tag is the recommended tag to use in trigger conditions because it is stable. The `textyess_org_` tag is for readability and may change if you rename the organization.
### This will allow us to:
The app will automatically create a view named "TextYess" where all new conversations with the AI agent will be visible
The app then automatically will send all new replies / comments created from your Zendesk account to TextYess. Remember that sending messages from Zendesk's ticket page will stop the AI to reply to the customer!
## On every new WhatsApp conversation:
1. TextYess automatically creates a **customer in Zendesk** with:
* Email: `zendesk_@textyess.com`
* Their phone number attached to their profile
2. A **ticket is created with status: “solved.”**\
This indicates the AI is actively managing the conversation.
3. If the **customer replies,** Zendesk automatically reopens the ticket as **“open.”**\
The AI detects the new message and sends a response.
4. After the AI responds, the ticket is automatically updated back to **”solved.”**
5. If a **human agent** sends a message to the customer from Zendesk, **the AI immediately stops replying**, , and the conversation is handled exclusively by the support team.
### Multi-account setup (multiple TextYess organizations)
If you connect multiple TextYess organizations (e.g. different markets) to the **same Zendesk instance**, each organization needs its own webhook trigger so that replies are routed to the correct WhatsApp account.
#### How it works
Each TextYess organization automatically tags its tickets with:
* `textyess_orgid_{organization_id}` — a unique, stable identifier for the organization
* `textyess_org_{company_name}` — a human-readable label (e.g. `textyess_org_velasca_uk`)
You can find the `organization_id` in the webhook URL shown on each TextYess organization's Zendesk integration page.
#### Step-by-step
1. In Zendesk, go to **Admin → Objects and rules → Business rules → Triggers**.
2. For **each TextYess organization**, create a trigger:
* **Name:** e.g. “TextYess - Velasca UK”
* **Conditions (Meet ALL):**
* `Tags` → `Contains at least one of the following` → `textyess_orgid_{organization_id}`
* `Comment` → `Is` → `Public`
* **Actions:**
* `Notify webhook` → select the webhook for that organization's URL
3. If you previously had a single trigger for all TextYess tickets, update it to use the org-specific tag, or disable it and create per-org triggers.
#### Important notes
* Only **new tickets** created after connecting will have the org tags. Existing tickets are unaffected.
* The `textyess_orgid_` tag is the recommended tag to use in trigger conditions because it is stable. The `textyess_org_` tag is for readability and may change if you rename the organization.