> ## Documentation Index
> Fetch the complete documentation index at: https://docs.textyess.com/llms.txt
> Use this file to discover all available pages before exploring further.

# WhatsApp Bubble installation

> Install the WhatsApp chat bubble on your WooCommerce store. This floating widget allows customers to start a conversation with your AI Shopping-Assistant via WhatsApp.

<Note>
  Looking for the Onsite Chat Widget instead? Check out the [Onsite Widget installation guide](/onsite-widget-installation-woocommerce).
</Note>

Pick the method that works best for you:

<Tabs>
  <Tab title="Option A: Visual Editor (recommended)">
    <Steps>
      <Step title="Customize your widget appearance">
        Click on the "Growth tool kit" section of the menu. From there select the Chat Bubble integration block and personalize your widget.
      </Step>

      <Step title="Get the code snippet">
        From there you will find the code snippet to insert into your Woocommerce theme. <br />
        The code will look something like this:

        ```html theme={null}
        <script
          type="module"
          src="https://cdn.textyess.com/v2/textyess-widget-components/textyess-widget-components.esm.js"
          defer
        ></script>
        <textyess-bubble-widget user_id="your_organization_id" />
        ```
      </Step>

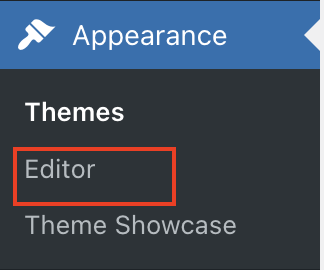
      <Step title="Go to Appearance > Editor">
        Once inside your store click on "Appearance" from the menu on the right. <br />

        From there click on "Editor"

        <Frame>
          <img src="https://mintcdn.com/textyess/CVMciMMYq5u5Kcmp/images/appearance_menu.png?fit=max&auto=format&n=CVMciMMYq5u5Kcmp&q=85&s=019bc305bcb5b45b1d1c92f516996d44" width="324" height="270" data-path="images/appearance_menu.png" />
        </Frame>
      </Step>

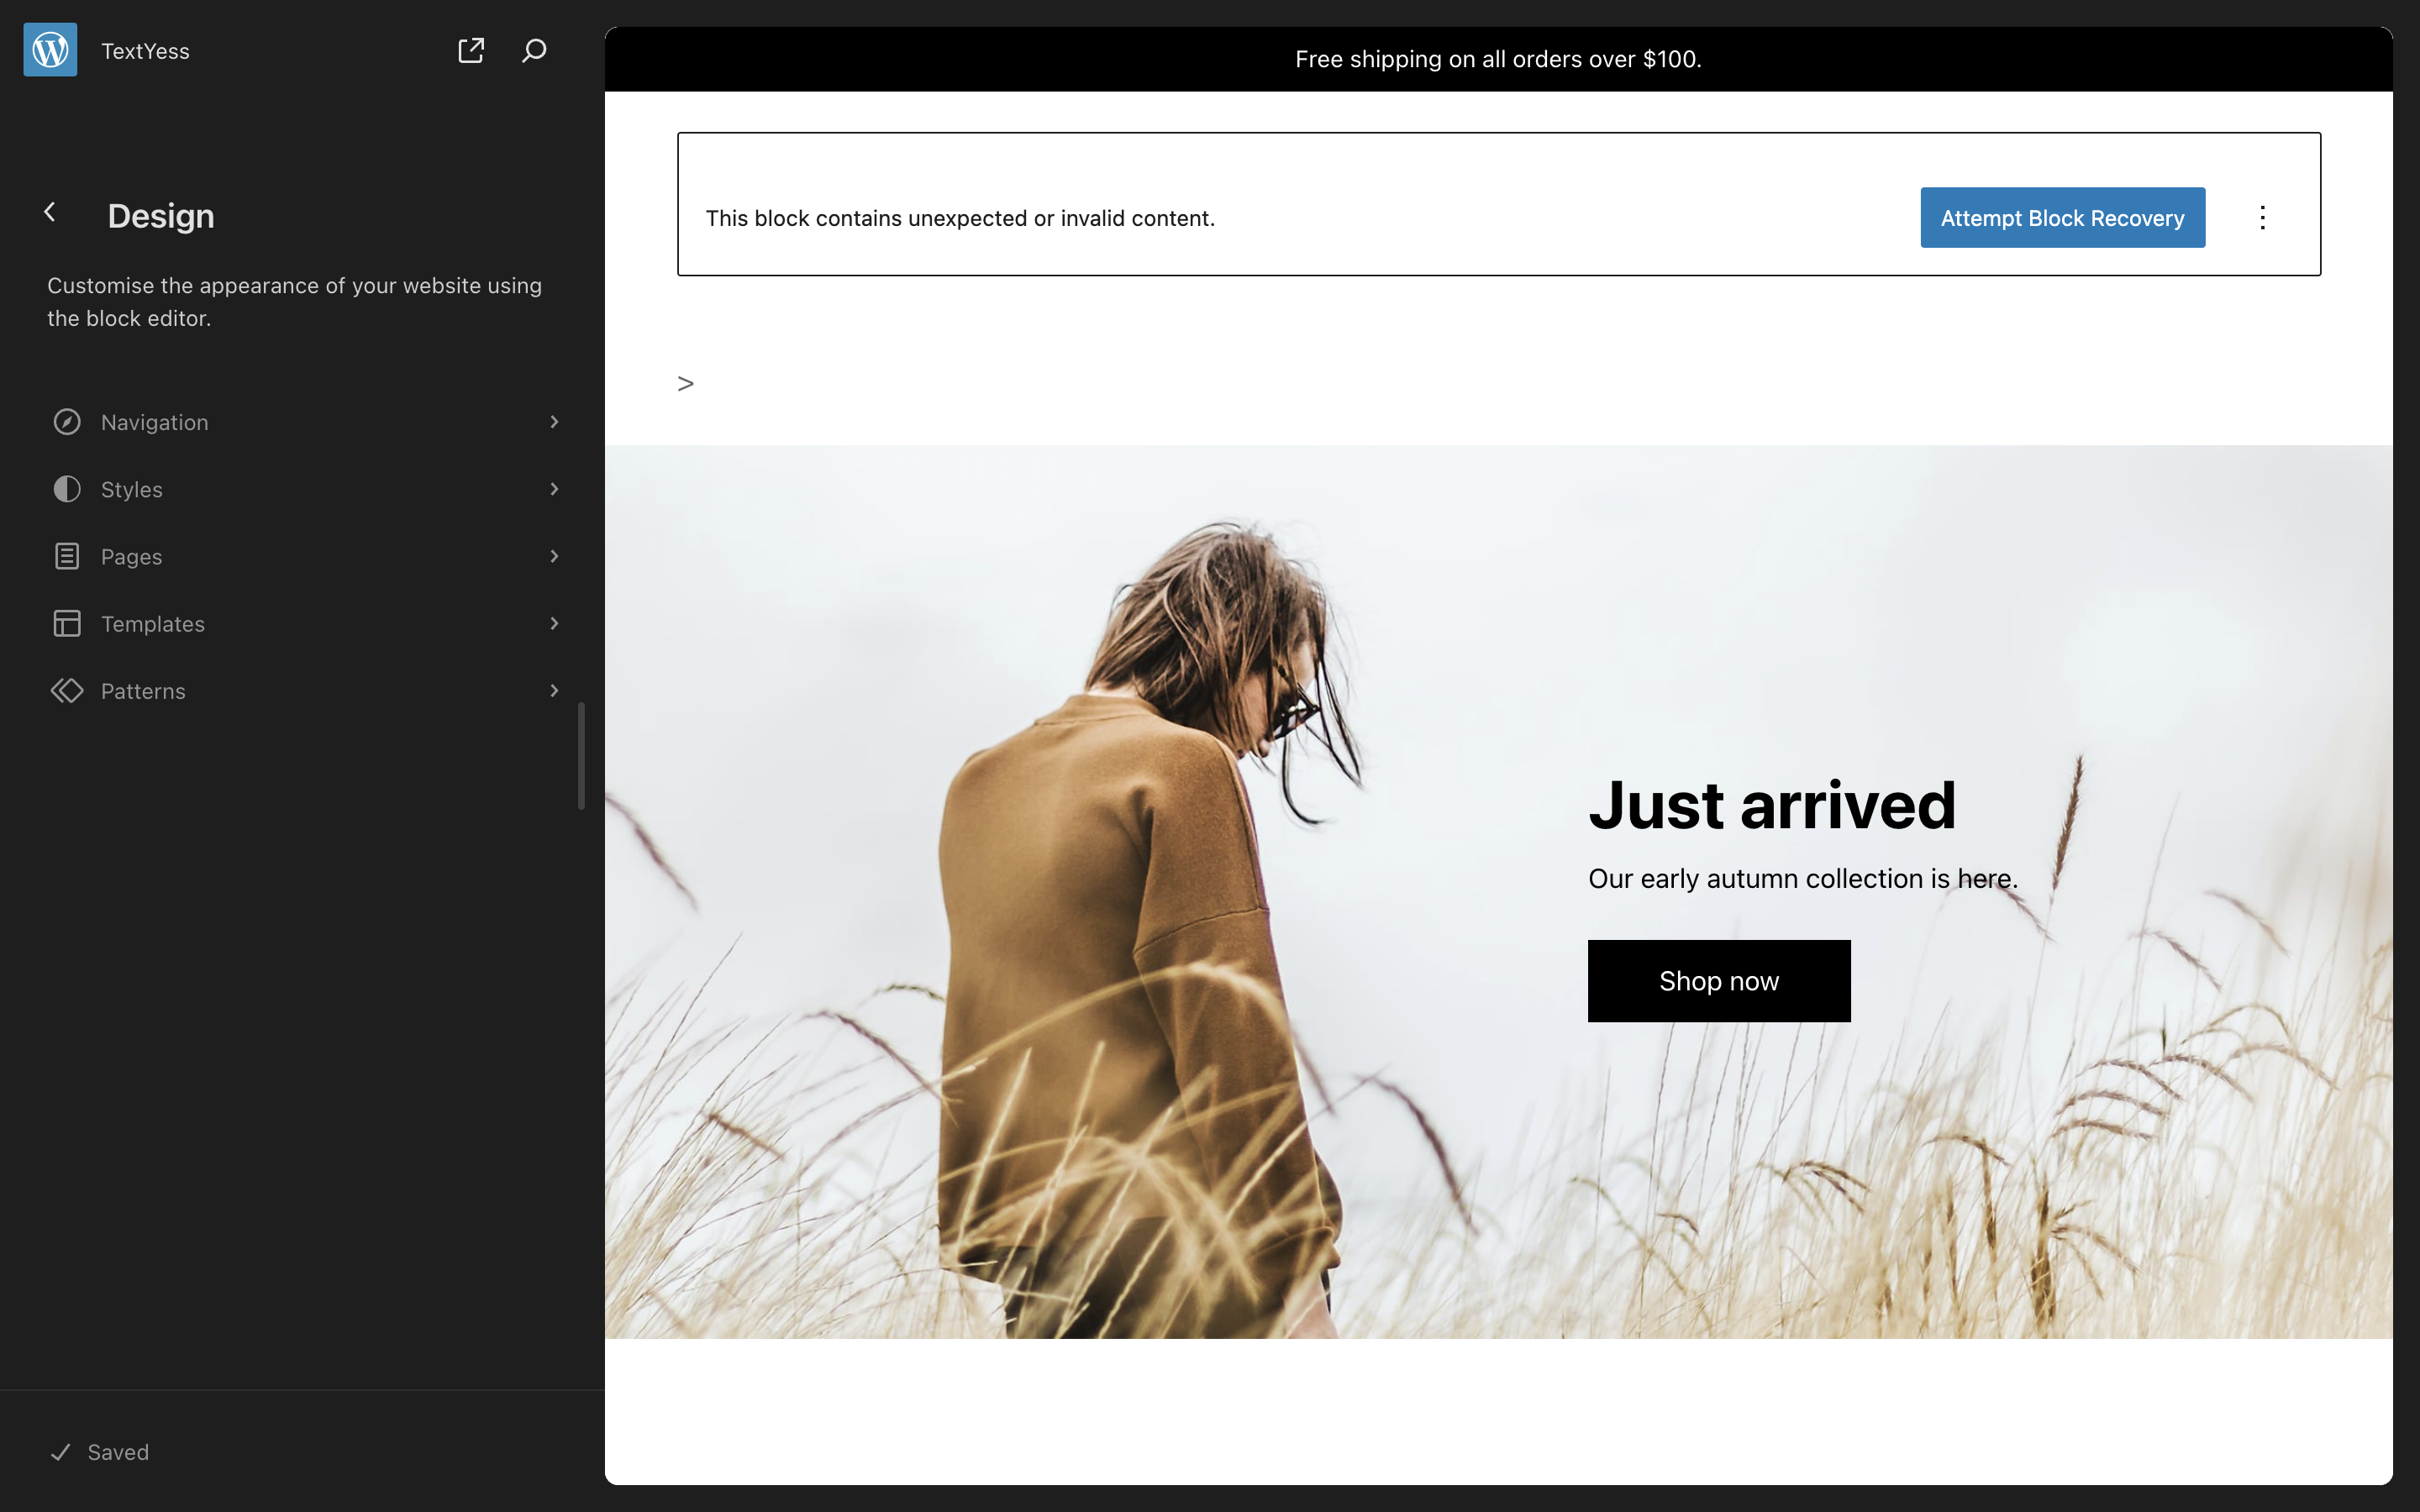
      <Step title="Open the Patterns section">
        Once opened the editor, you should see something like this. You will need to click the "Patterns"  <br />
        <Frame>
          <img src="https://mintcdn.com/textyess/CVMciMMYq5u5Kcmp/images/theme-editor-woocommerce.png?fit=max&auto=format&n=CVMciMMYq5u5Kcmp&q=85&s=5f7cfaf79ecb0d852e193367a2506647" width="2880" height="1800" data-path="images/theme-editor-woocommerce.png" />
        </Frame>
      </Step>

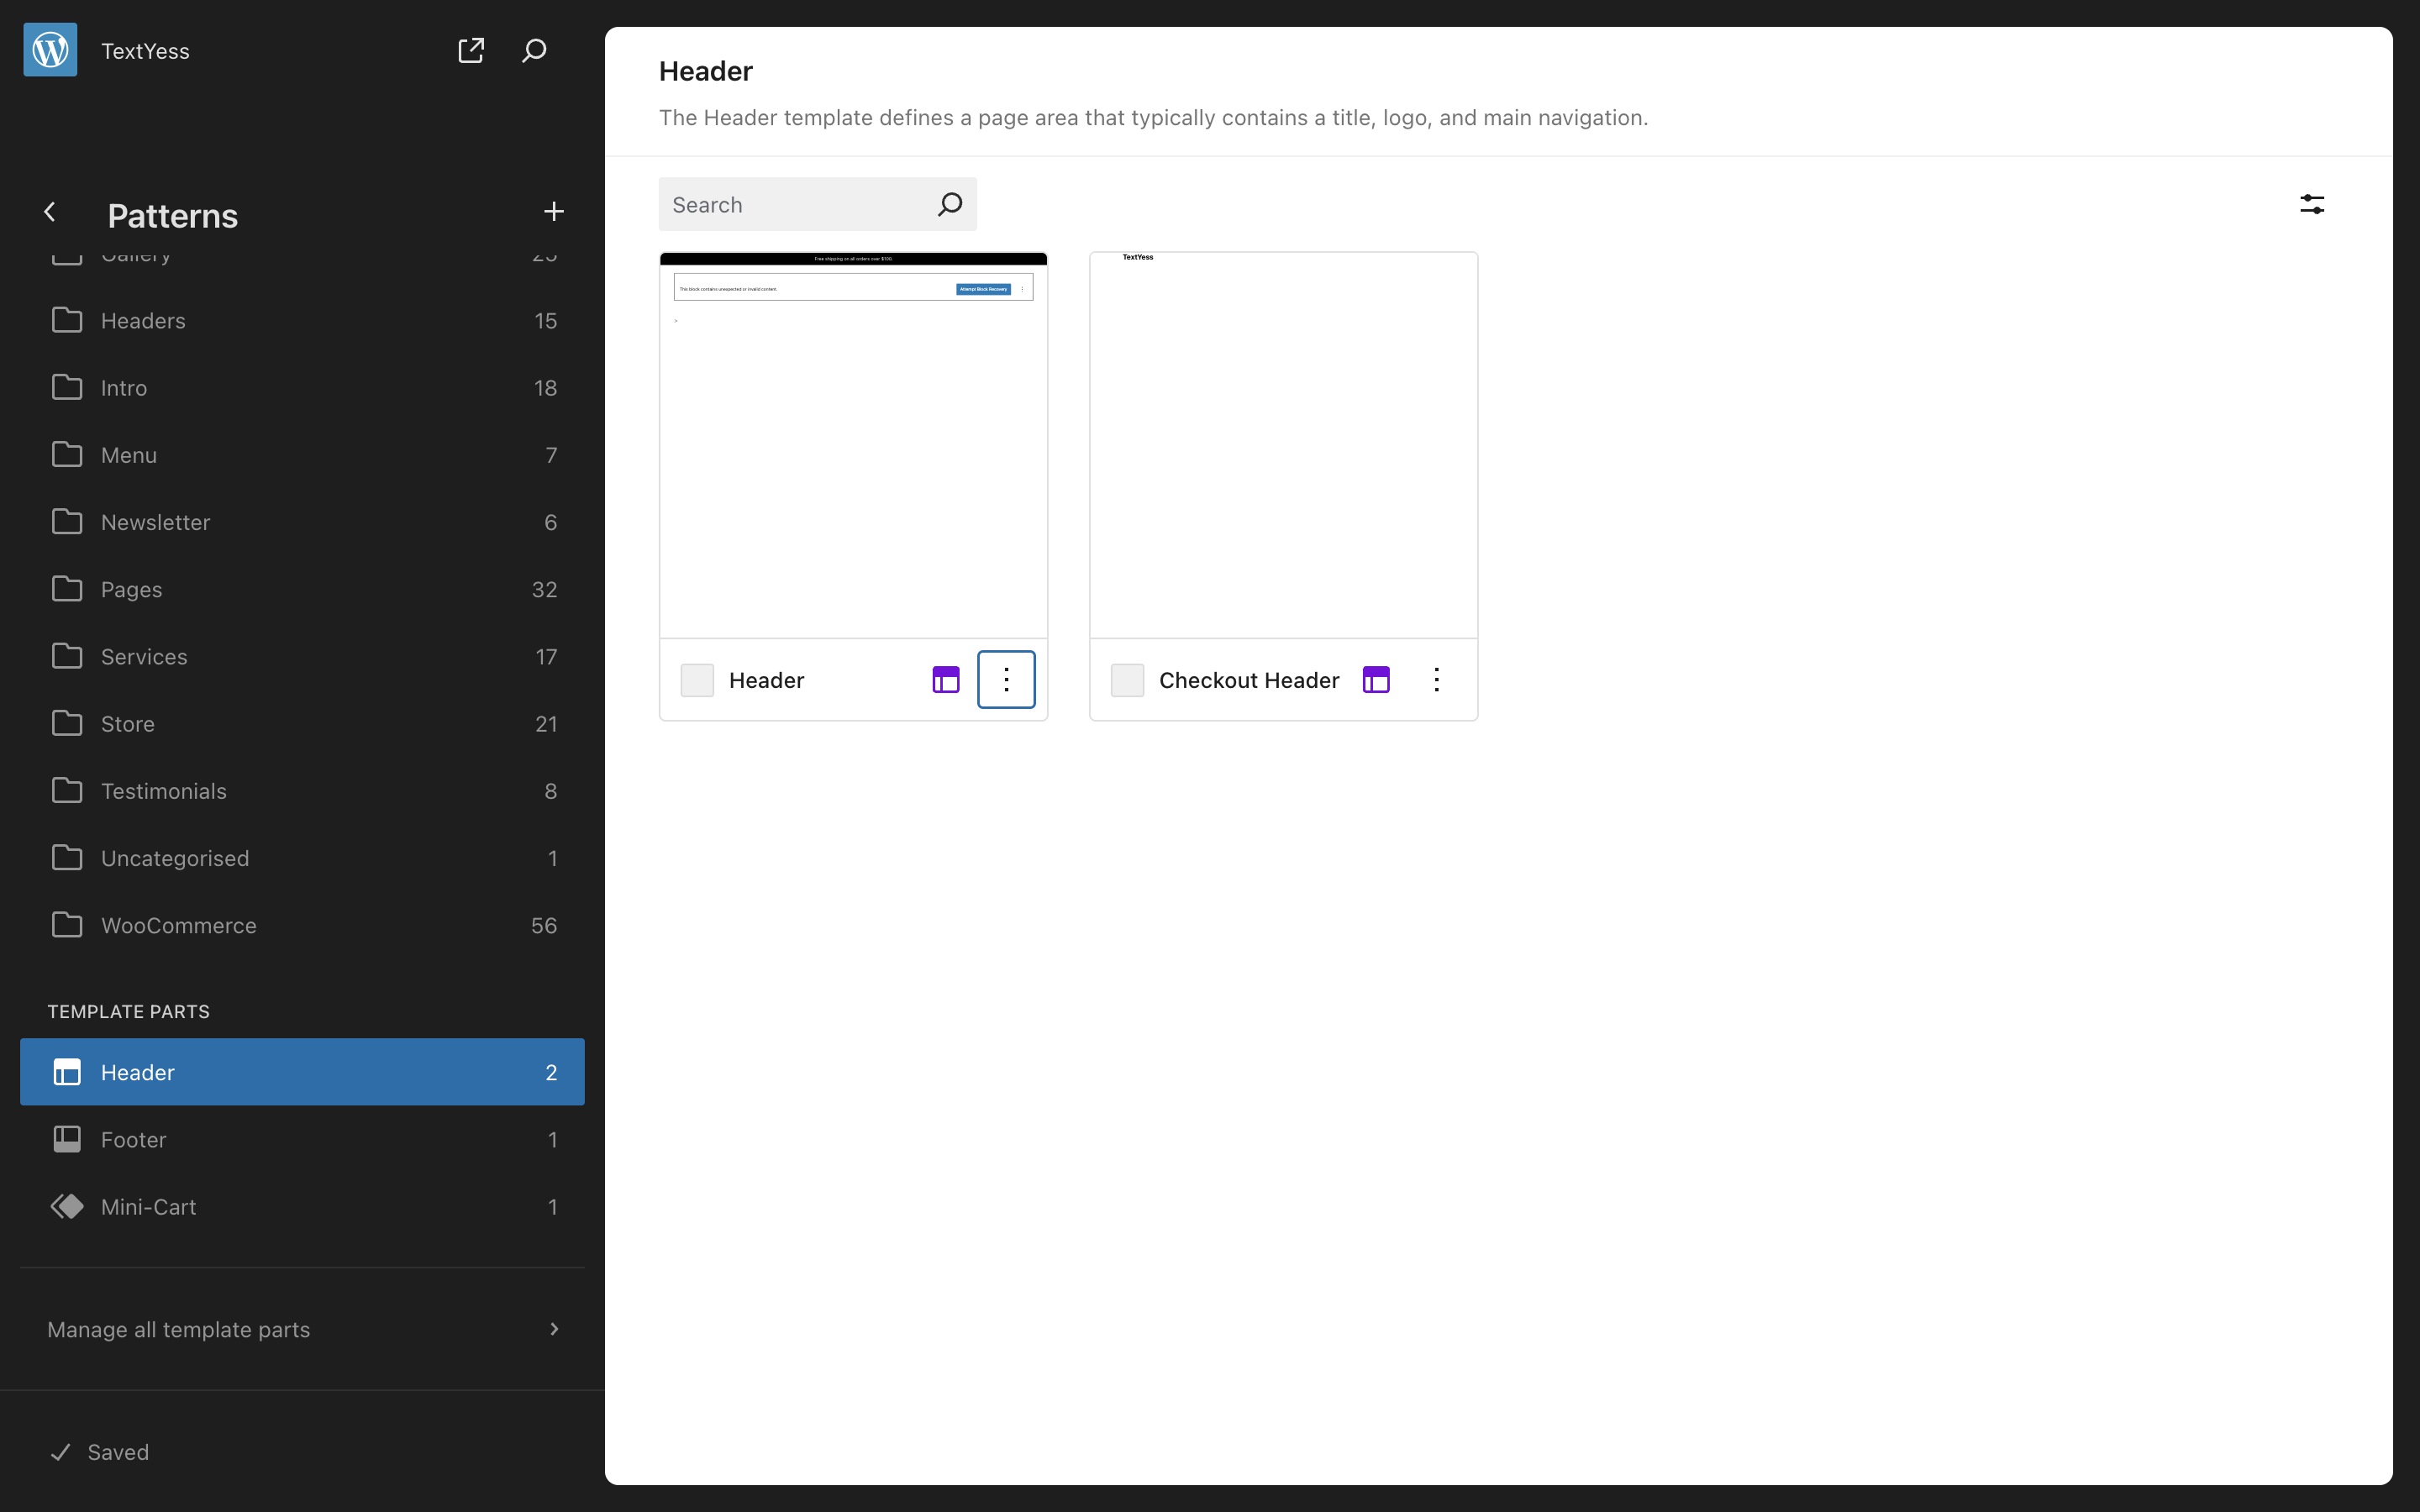
      <Step title="Open the Header pattern">
        Several patterns will be shown. You need to scroll down and select the one named "Header"<br />
        Once again, more than one header pattern may shown. Click the one in which you want to show the widget.

        <Tip>
          Before proceeding we strongly recommend that you duplicate the pattern that
          you want to edit. To do this, click on the three dots, then click on
          "Duplicate".
        </Tip>

        <Frame>
          <img src="https://mintcdn.com/textyess/CVMciMMYq5u5Kcmp/images/header-section-woocommerce.png?fit=max&auto=format&n=CVMciMMYq5u5Kcmp&q=85&s=b237546c96ad8e137a8d30aa880b08e8" width="2880" height="1800" data-path="images/header-section-woocommerce.png" />
        </Frame>
      </Step>

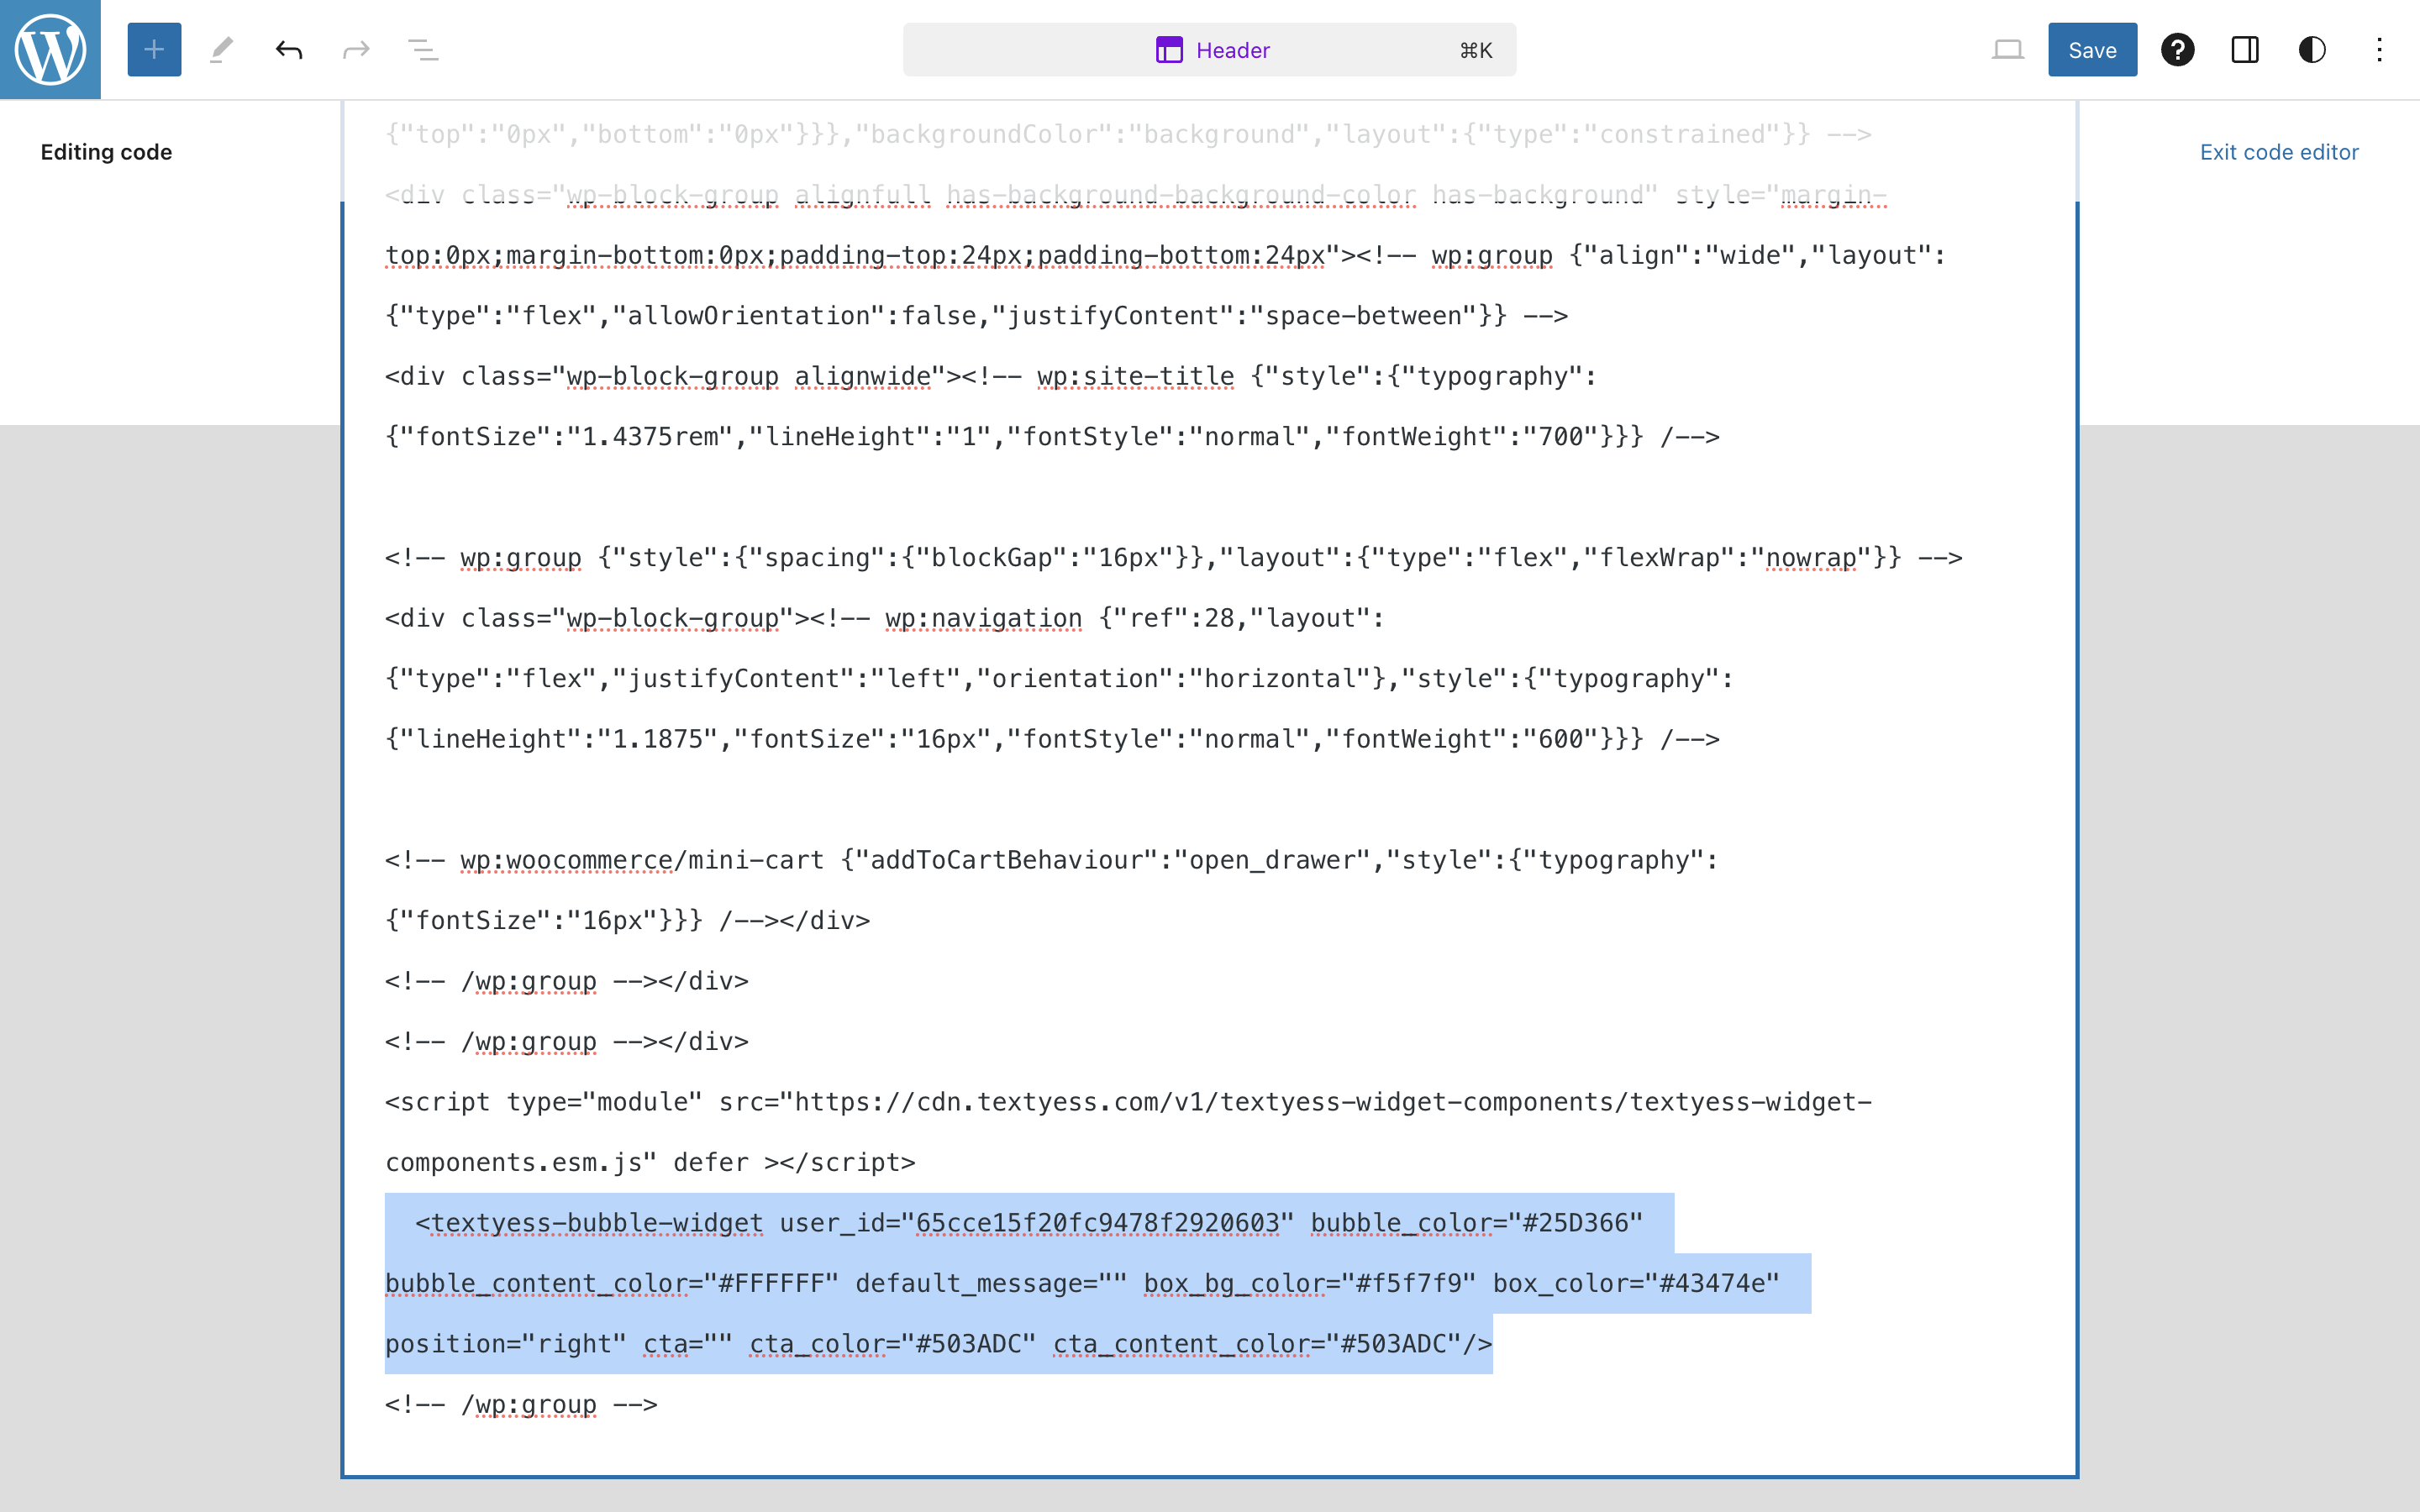
      <Step title="Edit and save the code">
        Got a the bottom of the file and paste the code from step 2 right before the last `<!-- /wp:group -->` <br />
        Once you have edited the code, click save in the upper right corner.
        <Frame>
          <img src="https://mintcdn.com/textyess/CVMciMMYq5u5Kcmp/images/add-bubble-widget-woocommerce.png?fit=max&auto=format&n=CVMciMMYq5u5Kcmp&q=85&s=7a32ada9e4fd2b70d0a88231fc354a5e" width="2880" height="1800" data-path="images/add-bubble-widget-woocommerce.png" />
        </Frame>

        <Check>Congratulations, we are live! 🥳</Check>
      </Step>
    </Steps>
  </Tab>

  <Tab title="Option B: footer.php (code snippet)">
    Use this method if you prefer adding code directly, or if the Visual Editor is not available on your theme. Adding the widget to `footer.php` is safer than `functions.php` because it simply outputs HTML before the closing `</body>` tag — no PHP hooks or function wrappers needed.

    <Steps>
      <Step title="Get the code snippet from the TextYess dashboard">
        Go to your **WhatsApp Agent** page, open the **Appearance** tab, and click the button to copy the code snippet. It will already contain all your settings — no need to change anything.
      </Step>

      <Step title="Open your theme's footer.php">
        In your WordPress admin panel, go to:

        **Appearance > Theme File Editor**

        On the right sidebar, find and click on **Theme Footer (footer.php)**.

        <Warning>
          **Where exactly is this file?** From your WordPress admin: sidebar menu > **Appearance** > **Theme File Editor**. Then look at the file list on the right side of the screen and click **Theme Footer (footer.php)**.
        </Warning>

        <Tip>
          If you're using a **child theme** (recommended!), edit the child theme's `footer.php` instead. This way your changes survive theme updates.
        </Tip>
      </Step>

      <Step title="Paste the code just before the closing body tag">
        Find the `<?php wp_footer(); ?>` line (usually near the bottom of the file) and paste the following code **right before it**. **Replace the placeholder values** with your own (you'll find them in the TextYess dashboard under Growth Tool Kit):

        ```html theme={null}
        <script type="module" src="https://cdn.textyess.com/v2/textyess-widget-components/textyess-widget-components.esm.js" defer></script>
        <textyess-bubble-widget
            user_id="YOUR_ORGANIZATION_ID"
            bubble_color="#25D366"
            bubble_content_color="#FFFFFF"
            initial_message="YOUR_WELCOME_MESSAGE"
            default_message="YOUR_DEFAULT_MESSAGE"
            box_bg_color="#FFFFFF"
            box_color="#43474e"
            position="right"
            cta="YOUR_CTA_TEXT"
            cta_color="#25D366"
            cta_content_color="#FFFFFF"
        />
        ```

        <Tip>
          Don't worry about replacing placeholders manually — the code you copy from the dashboard already has your values filled in. The snippet above is just an example of what it looks like.
        </Tip>
      </Step>

      <Step title="Click 'Update File'">
        Hit the **Update File** button at the bottom of the editor.

        <Check>That's it! The chat bubble should now appear on your store. Refresh any page to see it. 🥳</Check>
      </Step>
    </Steps>

    ### Troubleshooting

    <AccordionGroup>
      <Accordion title="I don't see the bubble on my store">
        * Make sure you clicked **Update File** after pasting the code.
        * Clear your browser cache and any WordPress caching plugin (WP Super Cache, W3 Total Cache, etc.).
        * Check that `YOUR_ORGANIZATION_ID` is replaced with your actual ID from the TextYess dashboard.
      </Accordion>

      <Accordion title="The widget appears but looks broken">
        * Make sure the code is pasted **before** `<?php wp_footer(); ?>`, not after `</html>`.
        * Verify the script tag is not being blocked by a security plugin.
      </Accordion>

      <Accordion title="I can't find footer.php">
        * Go to **Appearance > Theme File Editor** (not "Customize").
        * If you don't see this option, your hosting provider may have disabled file editing. In that case, use FTP or your hosting panel's File Manager to navigate to `wp-content/themes/YOUR-THEME-NAME/footer.php`.
      </Accordion>
    </AccordionGroup>
  </Tab>
</Tabs>