> ## Documentation Index
> Fetch the complete documentation index at: https://docs.textyess.com/llms.txt
> Use this file to discover all available pages before exploring further.
# WooCommerce onboarding
> How to connect your WooCommerce store to TextYess.
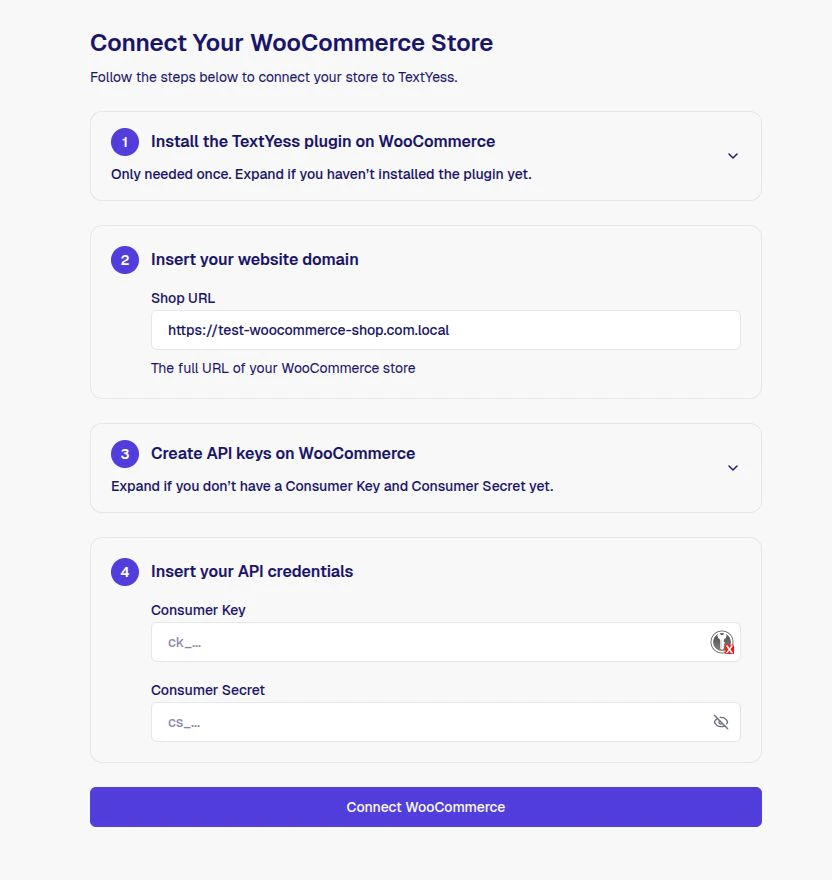
Go to the **Connect Your WooCommerce Store** page in the TextYess dashboard and follow the four steps below.
 ## Step 1: Install the TextYess plugin
Click **Download Plugin** in the dashboard to get the `.zip` file.
In your WordPress admin, go to **Plugins → Add New → Upload Plugin**, select the downloaded `.zip`, click **Install Now**, then **Activate Plugin**.
See the [WordPress plugin installation docs](https://wordpress.org/documentation/article/manage-plugins/#installing-plugins-1) for more details.
You only need to do this once. If you have already installed the plugin, you can skip this step.
## Step 2: Insert your website domain
Enter the full URL of your WooCommerce store in the **Shop URL** field, e.g. `https://your-store.com`.
## Step 3: Create API keys on WooCommerce
In your WooCommerce dashboard, go to **WooCommerce → Settings → Advanced → REST API**.
Click **Add key**, set **Description** to `TextYess` and **Permissions** to **Read/Write**.
Click **Generate API key** and copy both the **Consumer Key** and **Consumer Secret**.
See the [WooCommerce REST API docs](https://woocommerce.com/document/woocommerce-rest-api/) for more details.
These values are shown only once. If you lose them, you will need to generate a new key.
## Step 4: Insert your API credentials
Paste the **Consumer Key** and **Consumer Secret** from Step 3 into the corresponding fields, then click **Connect WooCommerce**.
Your store is now connected. TextYess will start importing your product catalog automatically.
***
Having trouble? See the [troubleshooting guide](/woocommerce-troubleshooting).
## Step 1: Install the TextYess plugin
Click **Download Plugin** in the dashboard to get the `.zip` file.
In your WordPress admin, go to **Plugins → Add New → Upload Plugin**, select the downloaded `.zip`, click **Install Now**, then **Activate Plugin**.
See the [WordPress plugin installation docs](https://wordpress.org/documentation/article/manage-plugins/#installing-plugins-1) for more details.
You only need to do this once. If you have already installed the plugin, you can skip this step.
## Step 2: Insert your website domain
Enter the full URL of your WooCommerce store in the **Shop URL** field, e.g. `https://your-store.com`.
## Step 3: Create API keys on WooCommerce
In your WooCommerce dashboard, go to **WooCommerce → Settings → Advanced → REST API**.
Click **Add key**, set **Description** to `TextYess` and **Permissions** to **Read/Write**.
Click **Generate API key** and copy both the **Consumer Key** and **Consumer Secret**.
See the [WooCommerce REST API docs](https://woocommerce.com/document/woocommerce-rest-api/) for more details.
These values are shown only once. If you lose them, you will need to generate a new key.
## Step 4: Insert your API credentials
Paste the **Consumer Key** and **Consumer Secret** from Step 3 into the corresponding fields, then click **Connect WooCommerce**.
Your store is now connected. TextYess will start importing your product catalog automatically.
***
Having trouble? See the [troubleshooting guide](/woocommerce-troubleshooting).